
Easy Kimchi recipe using the blender!!! This easy and simple Kimchi is also lighter and more refreshing than most – making it as wonderful as the Kimjang kimchis I ate at home in Korea.

Easy Kimchi recipe that is simple to make but also totally authentic tasting at the same time. Basically, I wanted a Kimchi that was as almost as yummy as the Kimjang Kimchi that came out of the buried Hangaris in our side yard when I was growing up…This is a recipe I have been wanting to develop for some time now but have not been able to for one reason or another.
But last December, it all started when I visited my good friend Judith (watch my YTV Documentary video to learn how we became friends) who moved away to a place about 2 1/2 hr away from my home. I don’t know what it is that happens when I visit her but I think there must be something… because something amazing usually happens on my blog whenever I see her.
One of the things we LOVE to do when Judith and I get together is to go shopping at Korean grocery stores. And as I often do, I started out saying —
“No.. I don’t need a cart. Because we are here to just buy a couple packets of Korean vegetable seeds. And I have a long drive back home later so..”
Yeah.. sure….just some seeds…you say…hahaha..well, before I knew it, I was buying a whole 50 lb box of Napa Cabbages!!! Because they just looked soo wonderfully fresh and perfect!!! I know.. I’m just crazy. 😜🤪
Who does that?? Buy a whole box of cabbages just because they look soo good?? So…I came home with about 35 lbs of cabbages after almost forcing poor Judith to take 3 cabbages which was about 14-15 lbs. Hehe. Sorry, Judith! I hope you still like me. 😍😉
I have been wanting to do a mini Kimjang and so this was just perfect. My mom was coming from Korea in late December and I wanted my mom to enjoy some good Lee family style Kimjang kimchi 김장김치. BTW, I can confidently say that I got high marks from my mom for this Kimchi.
“This is actually the BEST Kimchi I have tasted in my recent years!!!” was my mom’s exact comment. 💕 And ever since tasting it, she keeps wanting to plan the meal around the Kimchi. “Let’s have this soup so we can enjoy it with the Kimchi. Let’s have ramen so I can enjoy the Kimchi”
Why this Easy Kimchi using the Blender is so good and different
This North Korean style (yibuksik 이북식) Baechu Kimchi is lighter, milder tasting but oh so refreshing and fantastic. The addition of blended pear, radish, persimmon, and onion adds the perfect amount of zing and sweetness. As I have already shared before, my parents are originally from North Korea – IMPORTANT – BEFORE North Korea became a communist country. They moved down South during the Korean war, right before the DMZ was drawn to divide Korea into North and South Korea.
The Kimchi I grew up eating and loving is NOT the kimchi that’s most common in South Korea today. The Kimchi I grew up with is lighter in color (pink NOT red), not as heavily seasoned like most Kimchis of today but much milder but OH SO DELICIOUS. I wish I could have just simply asked my mom for a recipe but as you know in the old days there were no recipes. And honestly, it’s been quite a few years since my mom made Kimchi herself – as she is now 90 years old.
My mom and I agreed that because many Korean families no longer make Kimchi at home and all the commercially made ones are almost all South Korean style, the mild and clean tasting North Korean style Kimchi has all but disappeared. Only a few North Korean restaurants like Wooraeok or NampoMyeonok in Seoul serve it. BTW, this is NOT to say the South Korean style Kimchis are less delicious, it’s just that I personally have missed our own family’s Kimchi from many years ago.
Chef’s Tips for Making a Perfect Easy Kimchi using Blender
- Don’t brine cabbages too long, it will become salty, chewy and lose its sweet flavor. If you are not able to make Kimchi right after they are brined, rinse the cabbages first, drain and keep at that state for a couple days in the fridge or somewhere cold.
- Brine cabbages for 6-7 hrs in summer and 8-10 hrs in cold frigid winter temperatures. I brined it for 7 hrs here in California in December where room temperature was about 68°F.
- Kimchi made from cabbages cut this way as whole sections is called Pogi Kimchi (포기 김치). This does yield better flavor than when cut into individual small pieces (Mak Kimchi) but if you want to make it easier on yourself, you can use this same seasoning paste but cut the cabbages into smaller pieces before mixing in the seasoning.
- Substitute apples for persimmon if you cannot buy persimmon.
- Be sure to use Korean Solar Sea Salt with bittern removed. 3 year aged Cheonilyeom 3년 묶은 천일염 is best. Other sea salts can make your kimchi bitter.
- Please try using Kkanari Aekjeot (까나리 액젓) – Sand Lance Fish Sauce for this Easy Kimchi recipe. This is not easily available online but you can certainly buy it at any Korean grocery store. I find that this sauce is milder, smoother, cleaner and less fishy tasting than Myeolchi Aekjeot (멸치 액젓) – Anchovy Fish Sauce and makes a difference in the final outcome. But if you can’t find it, substitute Myeolchi Aekjeot and it should still be good.
- Use fresh and not frozen garlic and ginger.
- For extra umami flavor, ADD
- fresh chopped shrimp (about 1 large shrimp for 2 cabbages)
- a splash of maesil syrup – about 1 Tbs for 3 cabbages.
- 1/2 inch thick unpeeled but cleaned Radish slices to Brine in the last 3 hrs then rinse once and add to Kimchi
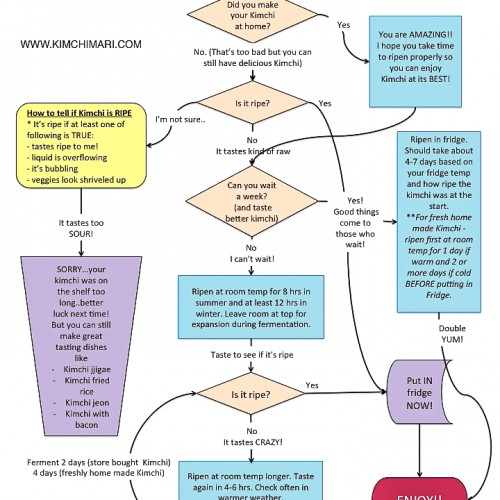
- Fully ripen your Kimchi to enjoy it at its best. Too often, people start eating Kimchi before they are fully ripe. Leave it out at room temperature for 1-2 days in the summer and 2-3 days in the winter. Please read my No Crazy Kimchi post to learn how to ripen Kimchi properly.
How to best store and enjoy my Easy Kimchi
- Kimchi always tastes best RIGHT OUT of the fridge, COLD so always keep your Kimchi cold until serving.
- Kimchi will keep for weeks and months in the refrigerator. Colder the temperature, the longer it will last and also will sour more slowly. They are edible as long as there are no molds that develop on top. e.g. I made this Kimchi on Dec 10th and the Kimchi tastes still marvelous today (Jan 28th), just a tiny bit sour.
Step-by-Step Instructions
How to pickle cabbages in brine
- Make brine by mixing Solar Sea Salt and water in 9 cup water to 1.5 cup salt ratio. For example, for 5~6 LARGE cabbages (total 20 lbs), mix 10 cups salt to 15 quarts of water.
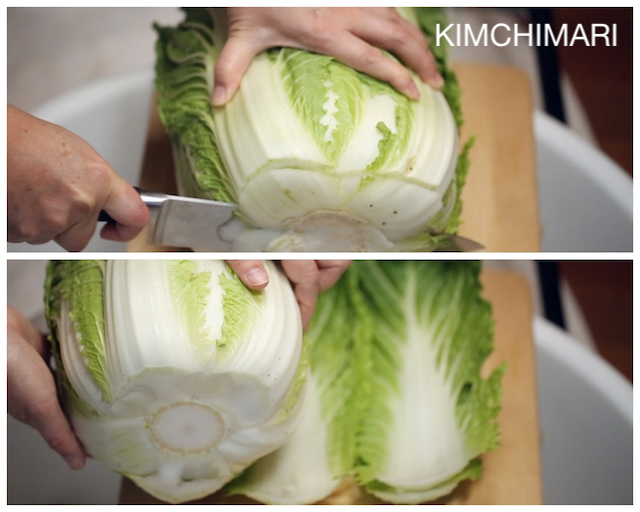
- Cut the root end (head) of each napa cabbage and save the outer big green leaves that fall away.

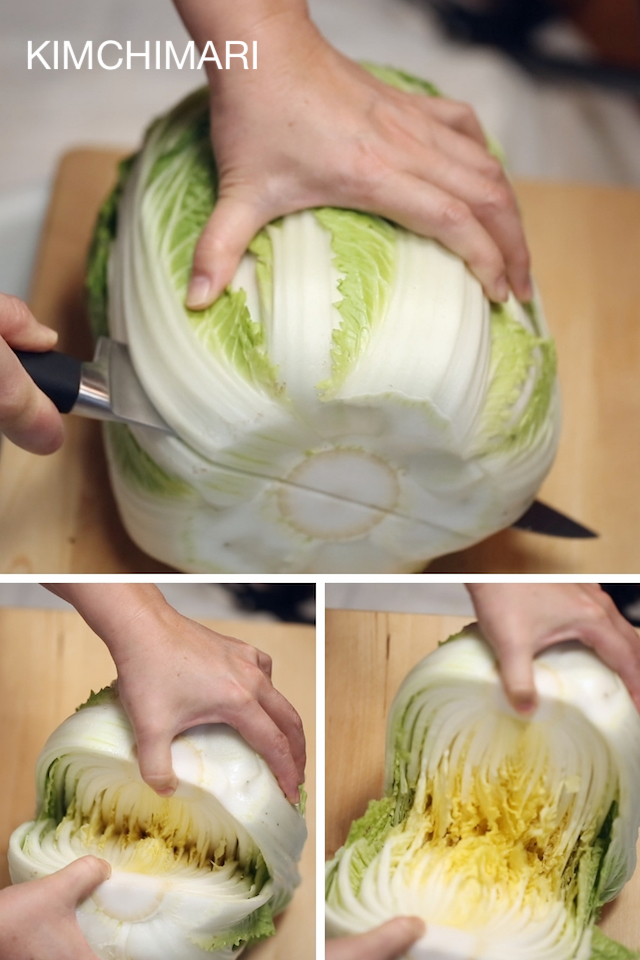
Cutting head of cabbage and outer leaves for Kimchi - Cut cabbage in half (lengthwise) or in quarters for bigger cabbages. TIP – don’t cut all the way down, just cut the top 2-3 inches or so – like this

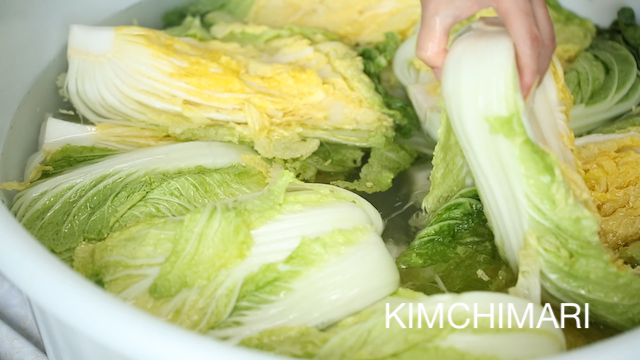
Splitting Napa Cabbage for Easy Kimchi and then use your hands to tear them apart into two pieces. This way, you don’t end up with little bits of cabbage that gets wasted because you are not blindly cutting all the leaves but letting the leaves choose which side they end up. See video below –
- In a large bowl big enough to hold ALL the cabbages, add the cut cabbages from 2.
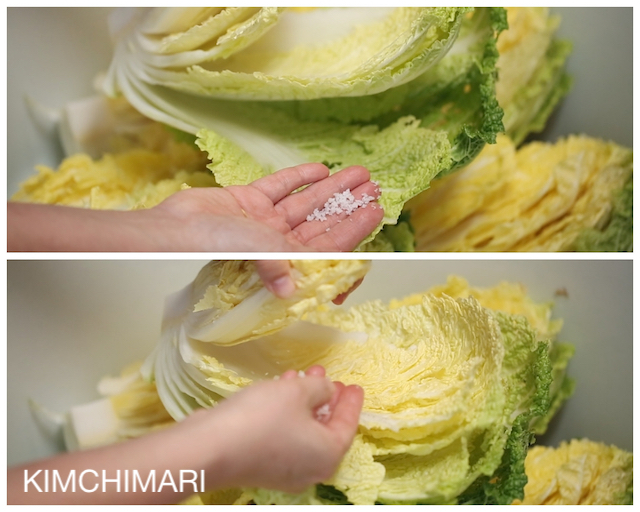
Salting Cabbage for Kimchi For each cabbage, sprinkle salt in between every other layer of leaves. Use about 3~5 Tbs salt for one whole cabbage (2 to 4 cut pieces). See video below –
- Repeat steps 2-3 until you cut all the cabbages and sprinkle salt in between leaves.
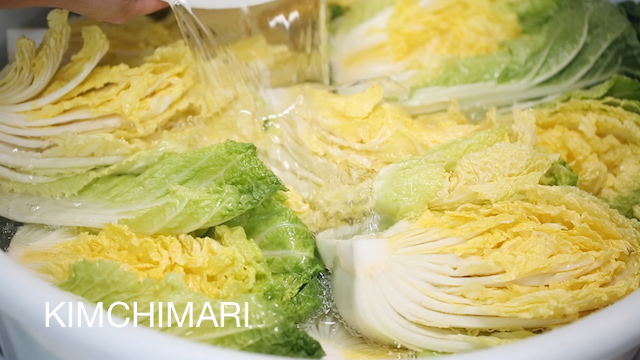
- Then pour the brine made in step 1 onto the cabbages while keeping them cutside up. Brine should barely or fully cover the cabbages.

Pouring brine to cut cabbages for Kimchi It may feel like there’s not enough brine but as long as cabbages can be fully immersed when you push the cabbages down (because they will be floating), it will be sufficient. Cabbages will shrink as they are pickled and so the brine will soon be more than enough.
- Let the cabbages sit in brine, at room temp for 3~4 hrs, turn all the cabbages over to have cut side down and rearrange cabbages so that ones on top will be buried at the bottom of the bowl and vice versa. Basically you want to turn everything upside down so that all parts of cabbages get equally immersed and pickled in brine.
Turning over cabbages in brine after 3 hours of pickling - Let cabbages pickle for 3~4 more hours (6~7 hrs total). *Depending on the weather (cold or warm), you may need to pickle longer. See Chef’s Tips above.
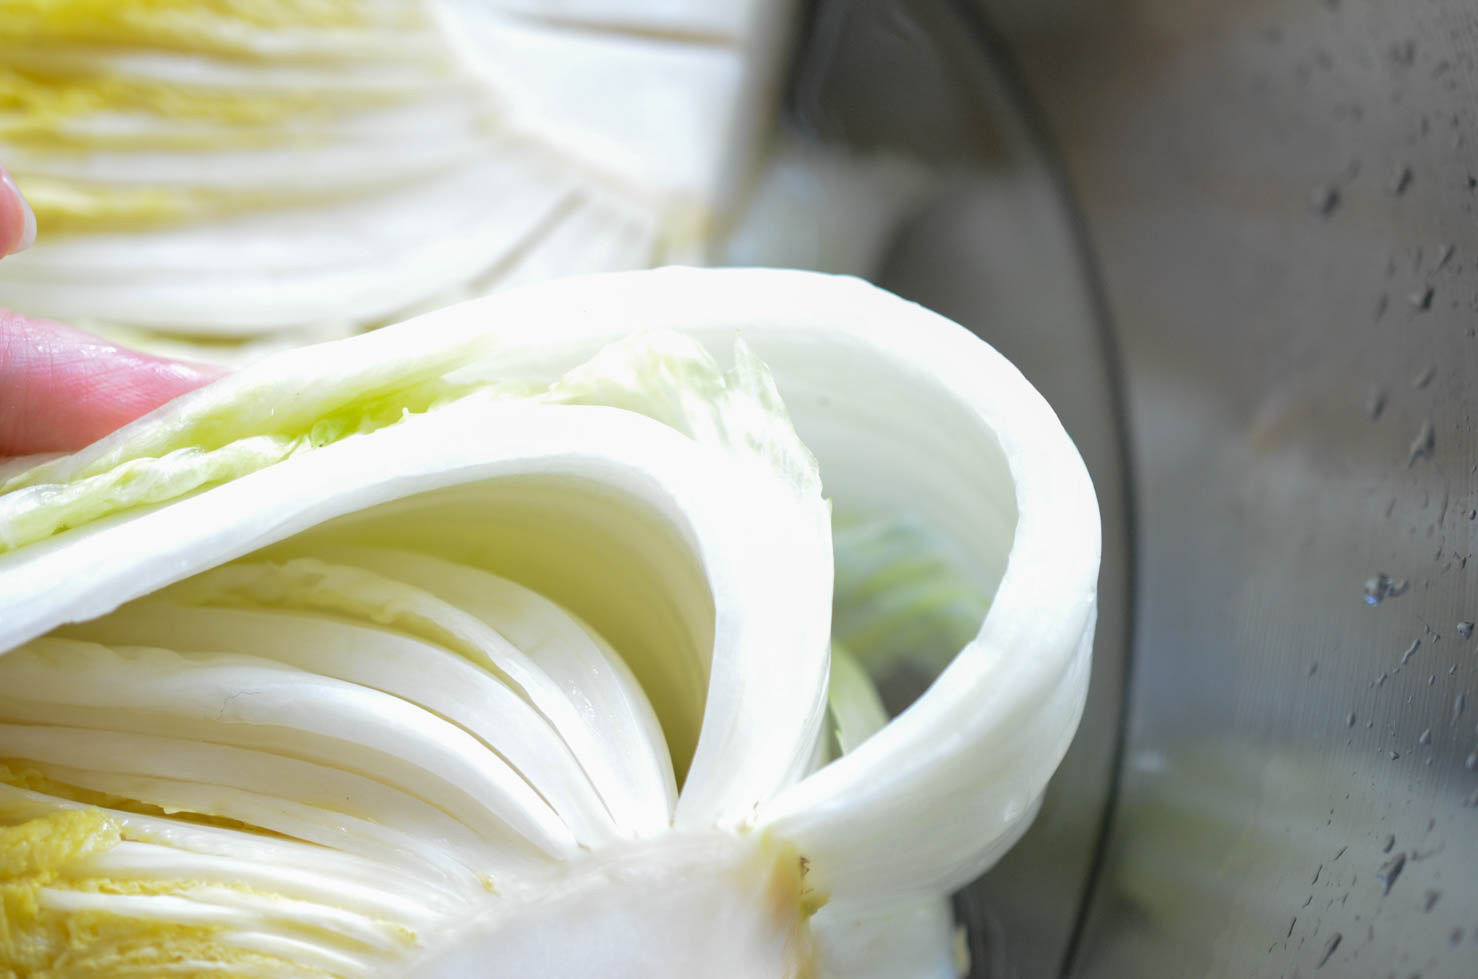
- Do a ‘bend’ test to see if cabbages are fully pickled.

bending cabbage - Bend the thickest part of the white fleshy part (close to the head) and if it bends without breaking and feels fully bendable then it’s properly pickled.
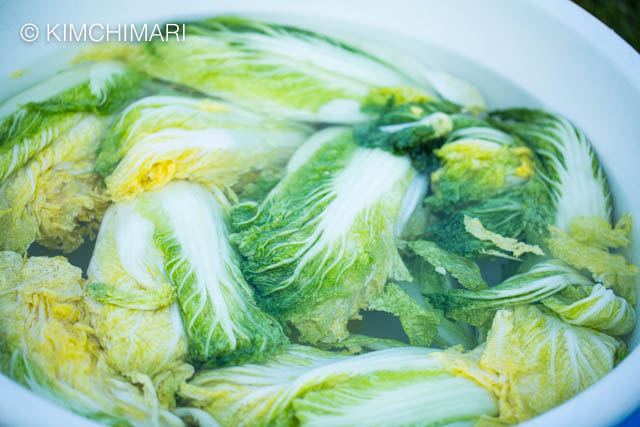
- Rinse cabbages by taking them out of the brine then putting them in a large bowl or bucket of water.

Salted Cabbage Rinsing for Easy Kimchi recipe Gently swish cabbages around in the water and stack them in a large dish rack or somewhere the water can drain away.
Salted Cabbage Rinsed and Draining for Easy Kimchi Repeat 2 more times for a total of 3 rinses. Change water before each rinse. Let it drain and set aside.

Make Easy Kimchi Seasoning in the Blender (while cabbages are pickling in brine)
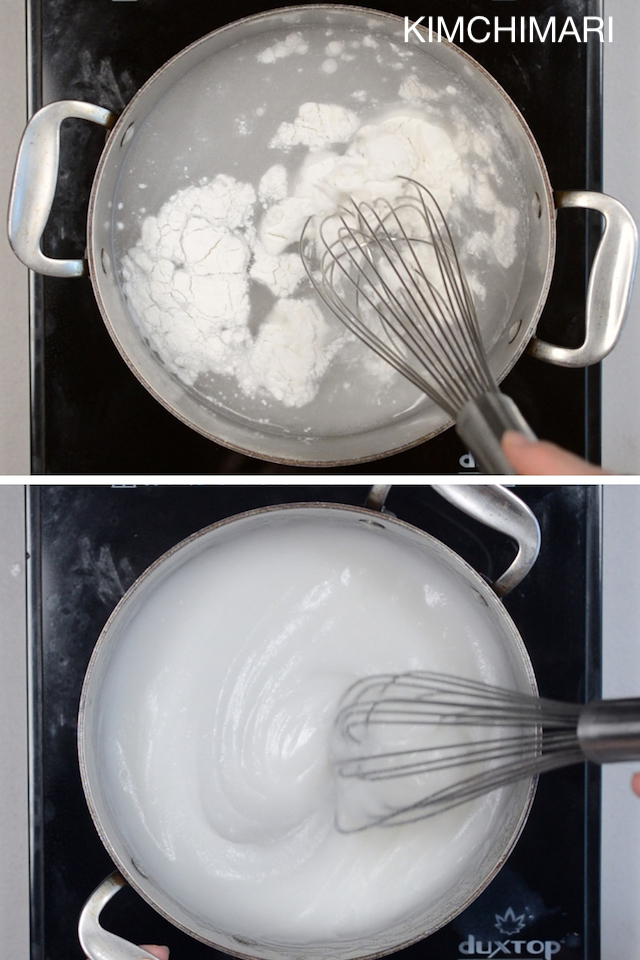
- Cook Sweet Rice Flour Paste

Making Rice Flour Paste for Easy Kimchi - In a pot, mix 1 cup cold water and 3 Tbs sweet rice flour (mochiko flour) with a whisk.
- Turn on heat to medium and keep whisking (about 30 seconds to 1 min) until it becomes thick and bubbling. Lower heat to medium-low and whisk for another 30 seconds or so while it keeps bubbling and fully cooked. Let it cool.
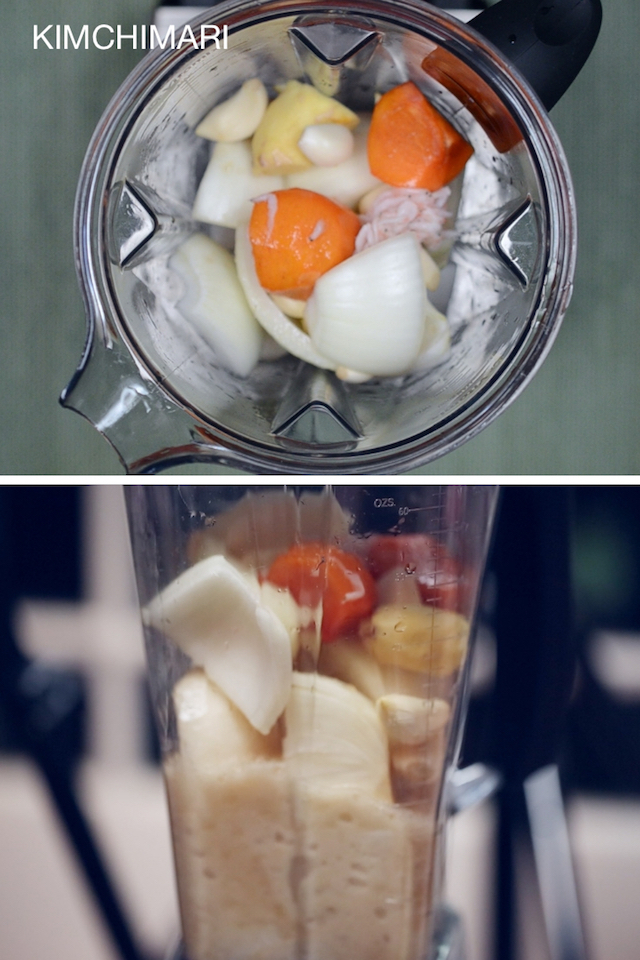
- Blender Seasoning –

Ingredients in blender for seasoning paste for Kimchi In a Blender, add following and blend until smooth
- Korean radish (Daikon radish), peeled and cut into chunks
- Korean (Asian) pear, peeled and cut into chunks
- yellow onion, peeled and cut
- garlic cloves
- ginger
- persimmon (optional)
- fermented shrimps (saewoojeot 새우젓)
- Sand Lance Fish Sauce (kkanari aekjeot 까나리 액젓)
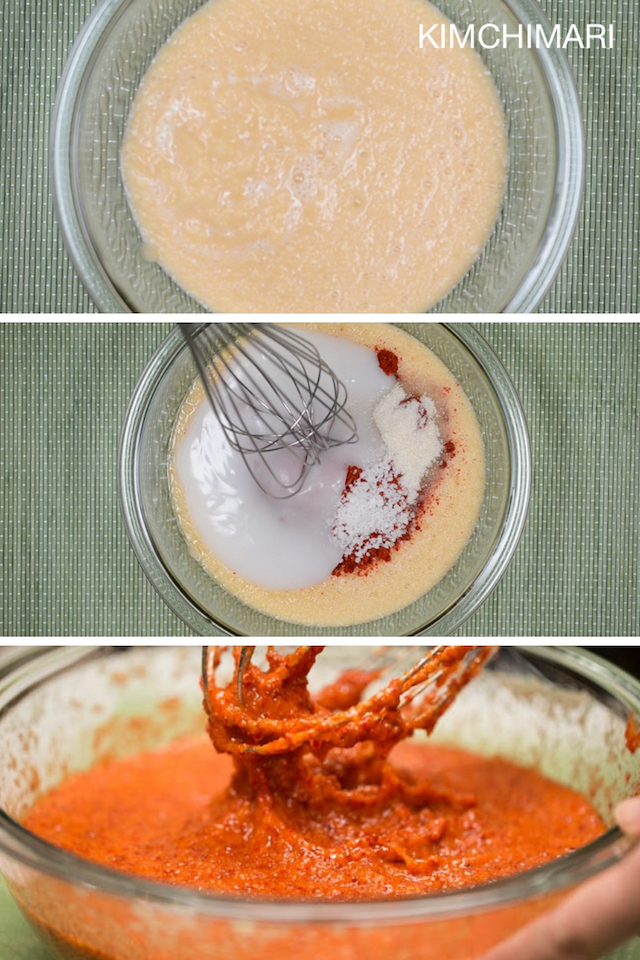
- Pour out blended mix from 2 into a bowl. Add Korean red chili powder (gochukaru), sugar, plum syrup and sea salt. Mix with whisk and taste.

Mixing Blender Seasoning for Easy Kimchi Add more red chili powder if you want it to be more spicy, but I hope you try my recipe the way it is first and see how delightful this kind of lighter and fresher Kimchi is.
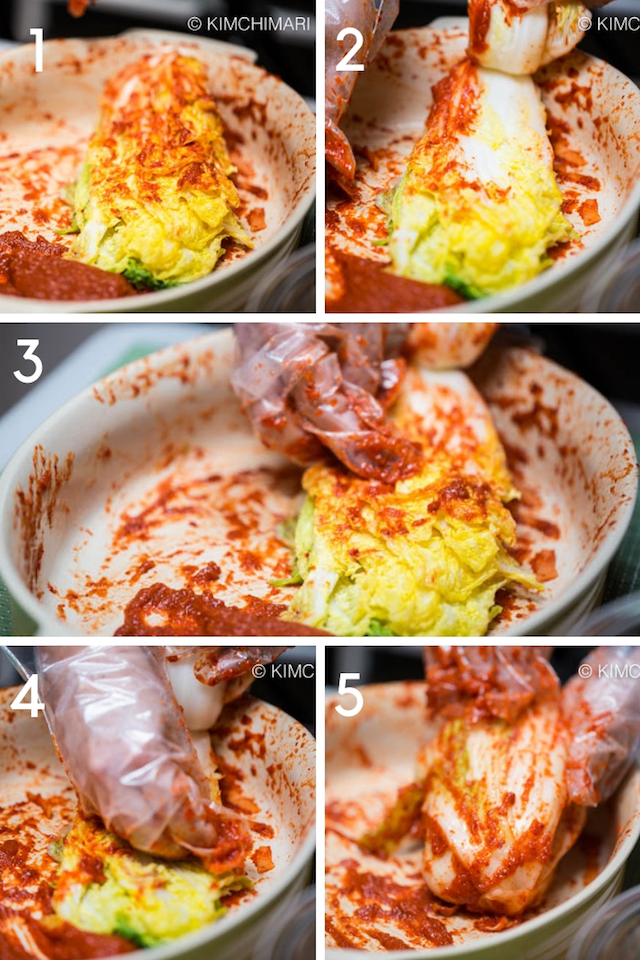
- First, put on some plastic gloves and get ready to coat cabbage with seasoning paste.

Coating Cabbage Kimchi with Seasoning Paste – Step-by-Step - In a large mixing bowl or container or a casserole dish (in my case) and put one piece of pickled cabbage (cut side up) and then put a scoop of the seasoning paste from 3 on top of cabbage.
- With your hands, coat the top cut side with the seasoning.
- Then add another scoop of the paste on the side. With one hand A, grab up all the cabbage except the outermost layer of leaves. With the other hand B, grab a little bit of the paste and coat the leaves, starting from the root end (thick white part) to the edge of the leaves. When fully coated, your hand A should let go of the next layer of leaves – and then you repeat coating in between layers with the seasoning paste. NOTE – you don’t HAVE to coat in between every layer. Insert seasoning maybe every 2-3 layer of leaves. So on the average, I insert and coat seasoning maybe 3-4 times per piece of cabbage.
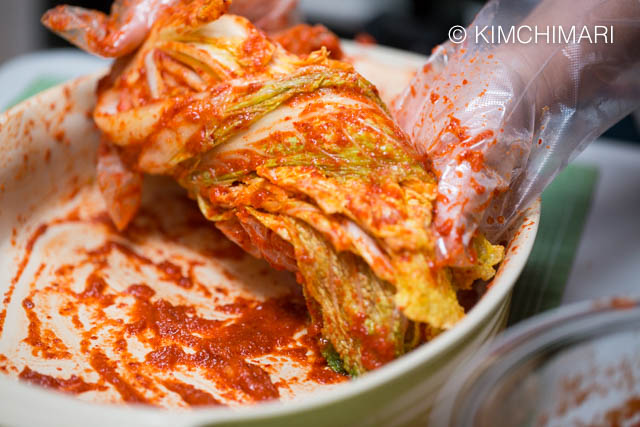
- Add more seasoning and coat the outer and all around the outside of the cabbage and then wrap it up with the outermost leaf.
Cabbage coated with Kimchi seasoning wrapped with outermost leaf Watch my video to see how I do it.
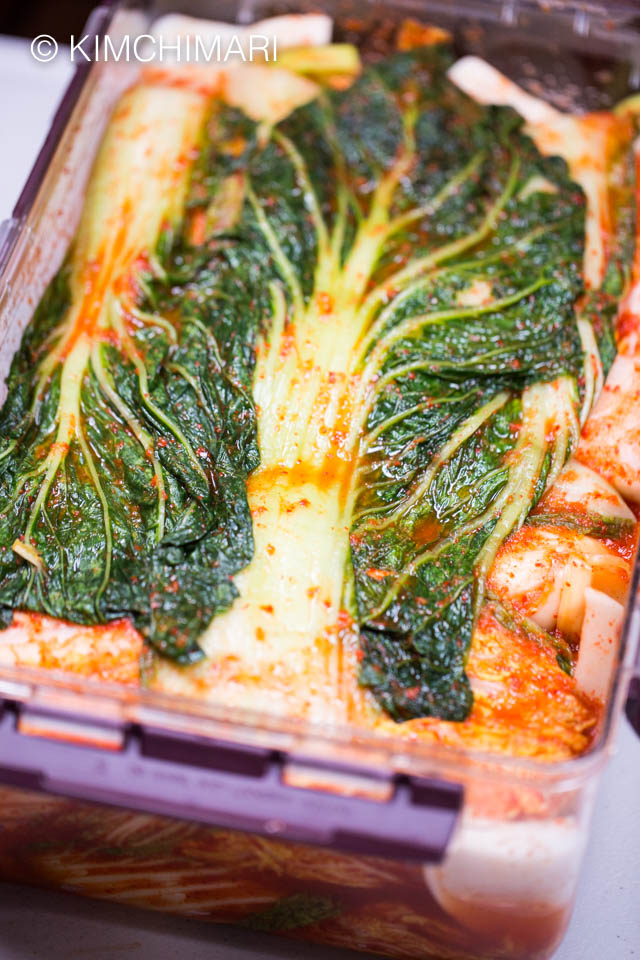
- Transfer seasoned cabbages to your Kimchi jar (or in my case, a plastic Kimchi container that came with my Kimchi refrigerator). Pack kimchi cabbages tightly in the container and press them down to minimize air pockets between cabbages.
- Coat large single leaves with seasoning paste and cover the top of the cabbages in 5 with these leaves.
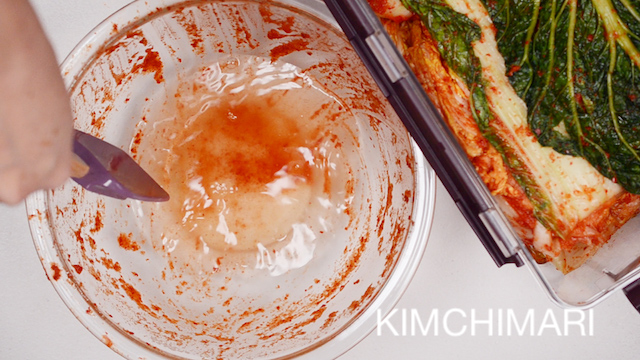
Easy Kimchi Cabbages in Plastic Kimchi Container - Add water (about 2 cups) to the empty seasoning paste bowl and rinse the bowl. Add 1/2 Tbsp sea salt to rinsed water and mix.
Rinsing the seasoning bowl with water to make liquid for Kimchi - Pour rinsed liquid from 7 on top of the Kimchi. Press everything down one last time to make sure everything is evenly covered with the liquid.
- Leave Kimchi at room temperature for 2 days at 68~70°F. (For summer temps 80° and over, leave 1 day at room temp. For winter temps lower than 65°F – you may need to leave it out for 3 days.) See my No Crazy Kimchi post to learn how to ripen properly.
- Once Kimchi smells and tastes like it is ripe, refrigerate immediately.
☆ Did you make this recipe? I hope you can give me a 5 star rating below!
Please leave me a comment below! I’d LOVE to hear from you! 😍
You can also FOLLOW ME on FACEBOOK, PINTEREST and INSTAGRAM or join my FACEBOOK GROUP to see, ask and share everything about Korean food with others just like you!
PLEASE WATCH THIS VIDEO because I TALK in this Video! I hope you find my words helpful. 💕


Easy Kimchi using Blender
Ingredients
- 5 each napa cabbage (4-4.5 lb each) (5 cabbages total about 20 to 22 lbs / 9.07 kg to 9.98 kg)
- 1 each Korean radish (cut into disks, optional)
Brine
- 15 quarts water
- 10 cups Korean sea salt (cheonilyeom), with bittern removed
Seasoning Paste
For Blender
- 10 oz Korean radish
- 0.5 each yellow onion (peeled and cut into chunks)
- 0.5 each Korean pear (peeled and cut into chunks)
- 3 oz garlic cloves (peeled)
- 0.5 oz ginger (peeled)
- 0.5 each persimmon, FUYU (peeled and seeded)
- 0.5 Tbsp saewoojeot (Korean fermented shrimps)
- 1/2 cup Kkanari Aekjeot (까나리액젓) (Fermented Sand Lance sauce)
Sweet Rice Flour Paste (you will use only 10 Tbs of this)
- 1 cup water
- 3 Tbs sweet rice flour
Add to blended seasoning
- 10 Tbsp sweet rice flour paste
- 1 cup Gochukauru (Red Chili Pepper Powder) (add up to 50% more if you like more spicy)
- 1 Tbsp sugar (about 1/2 Tbsp more if not adding persimmon)
- 1/2 Tbsp sea salt (cheonilyeom)
- 1 Tbsp green plum syrup (maesil exract) optional - see this post for recipe
Instructions
Prepare Cabbages and Radish
- Cut the root end (head) of 5 each napa cabbage (4-4.5 lb each) cabbage and save the outer big green leaves that fall away.
- Cut cabbage in half (lengthwise) or in quarters for bigger cabbages. TIP - don't try to cut all the way, just cut the top 2 inches or so and then use your hands to tear them apart into two pieces. This way, you end up with very little bits of scraps because you are not blinding cutting all the leaves but letting the leaves choose which side they end up. See video.
- In a large bowl big enough to hold ALL the cabbages, add the cut cabbages from 2. For each cabbage, sprinkle salt in between every other layer of leaves. Use about 3~5 Tbs salt for one whole cabbage (2 to 4 cut pieces). See video.
- Repeat steps 2-3 until you cut all the cabbages and sprinkle salt in between leaves.
- Rinse and clean off any dirt off the 1 each Korean radish. Keeping the skin on, cut radish into 1/2 inch thick slices.
Make Brine
- Make brine by mixing 10 cups Korean sea salt to 15 quarts water.
Pickle cabbages and radishes in Brine
- Pour brine onto cabbages. Brine should barely or fully cover the cabbages. It may feel like there's not enough brine but as long as when you push the cabbages down (because they will be floating) and cabbages can be fully immersed, then it will be enough. Because the cabbages will shrink as they are pickled and the brine will soon be more than enough. If you are adding radish, you should pickle them together in brine with cabbages.
- Let cabbages sit in brine, at room temp for 3~4 hrs. Then turn all cabbages over and also push cabbages that were on top to the bottom and vice versa. Basically you want to turn everything upside down so that the cabbages get an equal chance to be fully soaked in the brine. Let it pickle for 3~4 more hours (6~7 hrs total). Depending on the weather, in colder winter weather, you may need to pickle longer. See Chef's Tips above.
- Do a 'bend' test to see if cabbages are fully pickled. Bend the thickest part of the white flesh part, close to the head and if it bends without breaking and feels flexible then it's done. Rinse the cabbages either in running water or in a large bowl (but change water after first rinse). Stack them in a large dish rack or somewhere the water can drain away. Repeat 2 more times for a total of 3 rinses. Let it drain and set aside.
Sweet Rice Flour Paste
- In a pot, mix 1 cup waterand 3 Tbs sweet rice flour (mochiko flour) with a whisk.
- Turn on heat to medium and keep whisking (about 30 seconds to 1 min) until it becomes thick and bubbling. Lower heat to medium-low and whisk for another 30 seconds or so while it keeps bubbling and fully cooked. Let it cool.
Make Kimchi Seasoning paste in the Blender (while cabbages are in brine)
- In a Blender, add following and blend until smooth:10 oz Korean radish, 0.5 each Korean pear, 0.5 each yellow onion, 3 oz garlic cloves, 0.5 oz ginger, 0.5 Tbsp saewoojeot (Korean fermented shrimps)1/2 cup Kkanari Aekjeot (까나리액젓), 0.5 each persimmon, FUYU
- Pour out blended mix from 2 into a bowl. Add 10 Tbsp sweet rice flour paste, 1 cup Gochukauru (Red Chili Pepper Powder), 1 Tbsp sugar, 1 Tbsp green plum syrup (maesil exract) and 1/2 Tbsp sea salt . Mix with whisk and taste. Add more red chili powder if you want it to be more spicy, but I hope you try my recipe the way it is first and see how delightful this kind of lighter and fresher Kimchi is.
Coat cabbages with kimchi seasoning paste
- Put on some plastic gloves!! In a large mixing bowl or container or a casserole dish (in my case) and put one piece of pickled cabbage (cut side up) and then put a scoop of the seasoning paste from 3 on top of cabbage.
- With your hands, coat the top - cut side of cabbage with the seasoning.
- Then add another scoop of the paste on the side. With one hand A, grab up all the cabbage except the outermost layer of leaves. With the other hand B, grab a little bit of the paste and coat the leaves, starting from the root end (thick white part) to the edge of the leaves. When fully coated, your hand A should let go of the next layer of leaves - and then you repeat coating in between layers with the seasoning paste. NOTE - you don't HAVE to coat in between every layer. Insert seasoning maybe every 2-3 layer of leaves. So on the average, I insert and coat seasoning maybe 3-4 times per piece of cabbage.
- Add more seasoning and coat the outer and all around the outside of the cabbage and then wrap it up with the outermost leaf.
- Coat each cabbage with the seasoning paste and transfer them to your Kimchi jar or in my case, I used the plastic Kimchi container that came with my Kimchi refrigerator. Pack them tightly in the container and press them down so there's little gap between cabbages.
- Coat the large single leaves with seasoning paste and cover kimchi with leaves.
Make and pour Kimchi liquid
- Add water (about 2 cups) and rinse the empty seasoning bowl. Add 1/2 Tbsp sea salt and mix.
- Pour rinsed and salted liquid onto the Kimchi container. Press everything down one last time to make sure everything is even.
Ripen Kimchi
- Leave Kimchi at room temperature for 2 days at 68~70°F. (For summer 80° and over, leave 1 day at room temp and for winter - lower than 65°F - you may even need to leave it for 3 days. See my No Crazy Kimchi post to learn how to ripen properly.
- Once Kimchi smells and tastes like it is just ripened, refrigerate immediately and keep it refrigerated.
- Ripened Kimchi will keep for weeks and months. They are edible as long as there are no molds that develop on top.
Tips & Notes:
- The nutrition facts for this recipe is a very rough estimate as it's hard to calculate the brine and some of the other seasoning ingredients.
- Size of Cabbages - The cabbages I used here were large (3 lbs each) but yours may be smaller (1.5 to 2.5 lbs) so adjust recipe according to the size of your cabbages.
- This is MILD and LIGHT kimchi - if you like spicy or more red, increase red chili powder up to 50% and also increase other seasonings like fish sauce if you'd like.
- NUTRITION FACTS - sodium level - it is very hard for me to accurately calculate the sodium level because the brine is all discarded.
- Don't brine cabbages too long, it will become salty, chewy and lose its sweet flavor.
- Brine cabbages for 6-7 hrs in summer and 8-10 hrs in cold frigid winter temperatures.
- Substitute apples for persimmon or just add more sugar or maesil syrup (매실청)
- Be sure to use Korean Solar Sea Salt with bittern removed. 3 year aged Cheonilyeom 3년 묶은 천일염 is best since the bitter is removed thru aging. READ MORE HERE.
- Try to use Kkanari Aekjeot (까나리 액젓) - Sand Lance Fish Sauce if you can. This is not easily available online but you can certainly buy it at any Korean grocery store. I find that this sauce is milder, smoother, cleaner and less fishy tasting than Myeolchi Aekjeot (멸치 액젓) - Anchovy Fish Sauce and makes a difference in the final outcome. But if you can't find it, substitute Myeolchi Aekjeot and it should be still fine.
- For extra umami flavor, add fresh chopped shrimp (about 1 large shrimp for 2 cabbages) and a splash of maesil cheong syrup - about 1 Tbs for 3 cabbages.
- Be sure to fully ripen your Kimchi to enjoy it at its best. Please read my No Crazy Kimchi post to learn how to ripen Kimchi properly.


I’m kosher, is there a substitute for a shrimp extract?
Hi Rebecca, if you don’t want to use shrimps, just omit it and increase the amount of fermented fish sauce and a bit more salt to taste. Good luck!
Nd! Thank you so much for this recipe. It sounds delicious. However, I have a question. You mention plum syrup in your ingredient list but not how much and then you never mention it again in your recipe instructions (unless I keep overlooking it). I also can’t find it at all in the long instructions above the recipe. How much green plum syrup goes into this recipe, please? And when do I add it?
Thank you so much for asking! I don’t know what happened – I just edited the recipe. But you can add about 1 Tbsp of plum syrup to the basic 5 cabbage kimchi recipe. And you add it when you make the seasoning paste. Hope that helps. Thanks again!
Maybe I got my math wrong but that seems to suggest a 15% salt bring, which sounds really high? Considering that most recipes ask for 2-3%.
Am I missing something?
Hi MB, great question! The brine here is different from brine that’s used for the full fermentation cycle as in common pickles. Koreans use a very high salt brine to quickly pickle the vegetable and then the brine is discarded, then rinsed 3 times so most of the brine is washed away. So the resulting salinity of Kimchi is in the fermentation range. I have made this recipe for many years so the recipe is correct. Good luck!
Hi I have some leftover rice porridge that I used for Kimchi, how can I use it?? thank you very much 💗
Perhaps you can add some chicken broth and chicken meat and make Dak Juk? https://kimchimari.com/dakjuk-chicken-rice-porridge/ is the recipe post. Enjoy~!