Makgeolli is a traditional Korean rice wine (or brew) that has been made by Koreans for generations. Rice is fermented to produce a lovely creamy drink that’s just so delicious – a hint of sweet, tang and a zing that’s just fantastic with any Korean foods.
About Makgeolli
Makgeolli is a traditional Korean alcoholic drink that is made by fermenting rice and a fermentation starter called Nuruk 누룩. Many years ago, almost every family made it at home because it was quite easy to make and also was such a wonderful drink to have with Korean food. I have an Ultimate Guide to Makgeolli post that talks about this drink, its history, how it tastes and how to buy the best commercial one. Also, includes a fun story about my memories of it, so please check it out!
Brief history of how it was consumed
The way Makgeolli came about clearly shows the history of the Korean class culture during the Joseon Dynasty era where there was Yangban 양반 (the ruling class) and Sangmin 상민 (the lower class of servants and commoners). When rice was brewed to make Sul 술 (alcoholic drinks) very much like the recipe below, different parts of the sul was consumed by different classes.
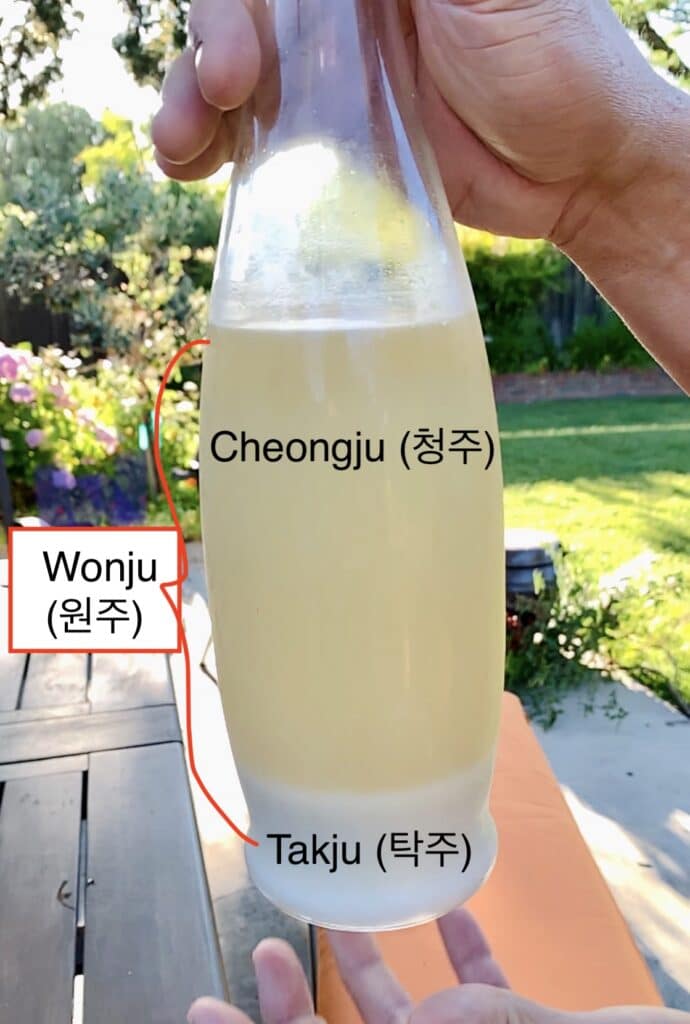
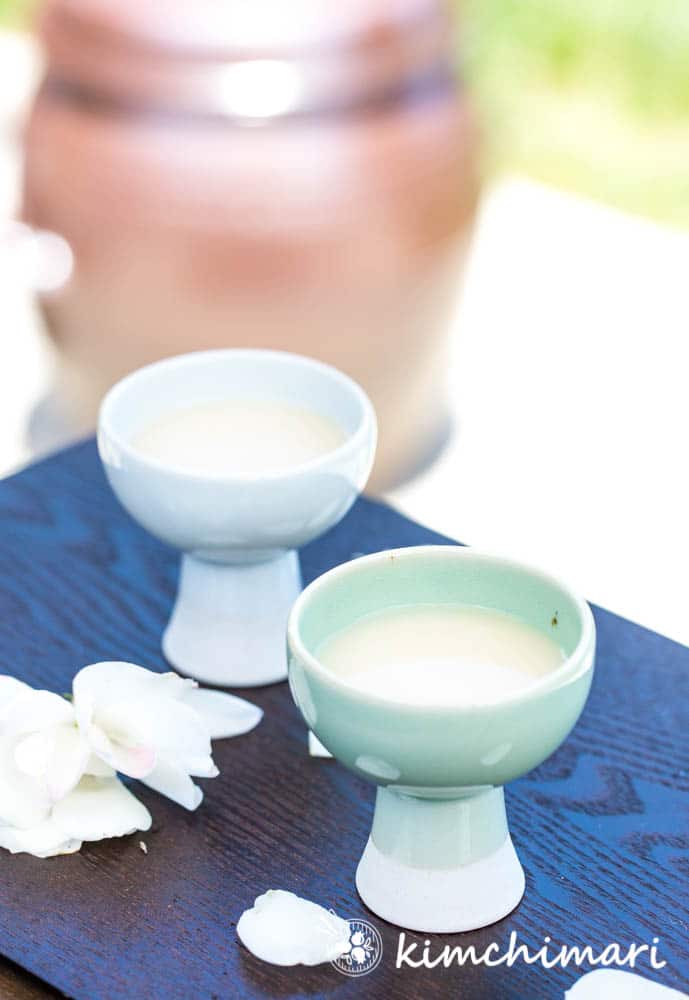
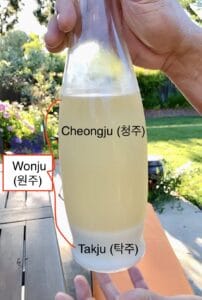
In this picture (held up by my very helpful husband 🤓), you can see how the rice sediments have settled at the bottom. The top clearer alcohol is called Cheongju 청주 and this was usually enjoyed by Yangban. The sediments that were filtered (called Jjigaemi 지게미) out to make Cheongju were left to be thrown away but the servants or farmers took them, added water, and strained it – which was called Makgeolli. The word comes from the phrase “막 걸러 Mak-geolleo” which means it was “just freshly strained”.
Recent History of Makgeolli
** To learn about the old history of this Korean drink and how to buy the best quality wines you can read more in my Ultimate Guide to Makgeolli.
Traditionally, Makgeolli was made with 100% rice but everything changed in 1965 (after the Korean war) when Korea had a food shortage throughout the country. The government ordered the breweries to stop using rice but use wheat flour instead. Wheat-based versions were less sweet and more sour than the traditional one made with all rice.
Due to this change, the drink somewhat lost its popularity through the 60’s to 80’s. And I remember it was a drink mostly enjoyed by construction workers and farmers back then. In the 90’s, with the abundance of rice in Korea, people started to make 100% rice makgeollli again.
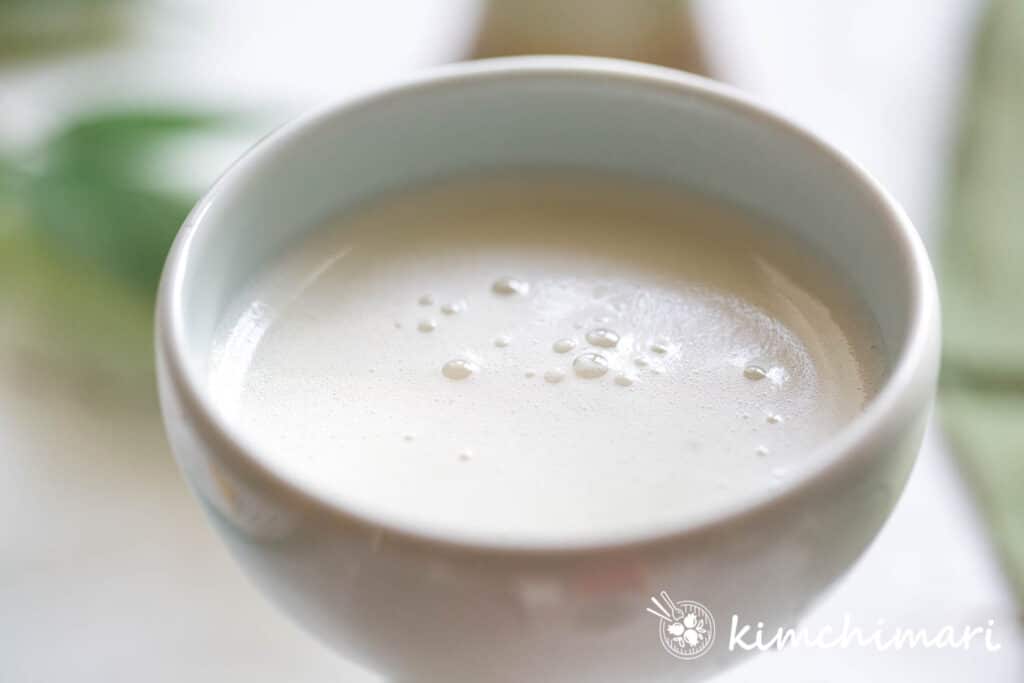
Also with the newly found interest in fermented foods, it has become more popular than ever. Breweries also started making flavored Makgeolli such as with peach and chestnuts. One of my favorite brewer (복순도가 Boksundoga) makes a very fizzy one which is one of my favorite. Here’s a closeup of my latest rice brew that’s still quite fizzy. 💕🥂
2 years in the making..
Believe it or not, this project has taken me more than 2 years (on and off, of course). Since I started, I have taken 2 Makgeolli making classes (if you are ever in Seoul, I recommend the Sool Company’s class – very knowledgeable and passionate people) and made several brews. But I was never completely happy with the result until now.
And there are many different recipes and methods out there and unfortunately, most recipes lack the details that help you navigate successfully under different brew conditions.
So please read all of my tips and directions carefully because with fermentation, there are so many factors that may seem unimportant but can affect the outcome greatly. THE MOST IMPORTANT is to learn to recognize when you should bottle it.
I also wrote another post about my Makgeolli making project with my good friend & winemaker at Vino Vargas. READ MY Makgeolli Project post.
DIFFERENCE between Homemade vs Commerical
- Alcohol Content – Traditional home-brewed Makgeolli typically has higher alcohol content than commercial ones. Commercial ones are usually 6% while home-brewed will be anywhere from 9~12%
- Additives – Home-brewed will taste sweet but with no added sugar or additives like aspartame. Commercially they add sweeteners because the original brew is diluted with water to reduce the alcohol content and then flavor has to be added back in.
- Flavor – I find home-brewed has a lot more complex flavors and less sweet than the store-bought ones.
- Active culture content – Unless you buy a Draft ‘Saeng makgeolli (생막걸리)’, you may get one that doesn’t have any live active cultures whereas home-brewed have tons of live cultures that are beneficial to your health.
How to make Makgeolli at home
TIP FROM JINJOO!
Chef’s Tips
- ROOM TEMPERATURE is the most IMPORTANT! – The ideal temperature for brewing Makgeolli is between 64.5℉/18℃ – 75℉/24℃. But within this range, I still found that the overall fermentation success is very closely related to the temperature. I often failed to make a good batch during the summer because it went very close to 75℉ for some days and soured very quickly. The higher the temperature, the faster the brewing will occur which means it will start to sour too fast before it has the full fermented flavor. You need to keep a very close watch in warm temps.
- STEAM RICE – use a bamboo steamer with a hemp or nonstick liner to steam rice. Steamed rice works best because we want the rice grains to be whole and stay firm and whole after mixing. Some recipes use the rice cooker and this can work but you will probably need additional yeast to ensure success. The reason why leaving the rice grains whole is important is because it helps to control the speed of fermentation. I tried using rice cooker cooked rice + summer warm temps and it ended up with sour flavor too soon.
- Sweet Sticky Rice vs Regular Short Grain White Rice vs Brown Rice – you can use either of these rice but the sweet rice (chapssal 찹쌀) has 100% Amylopectin which means there’s more sugar in this rice to be turned into alcohol and also produces a slightly sweeter brew. While short-grain rice (mepssal 멥쌀) has about 20% amlyopectin making it harder to brew with but produces a more dry and sour brew if you succeed. Sweet rice is also more expensive which may be another deciding factor. In the same line, brown rice will not brew well on its own. You will need to mix it with some white rice.
- Addition of baker’s yeast – this has been the hottest argued topic in my household.😜 My husband likes adding yeast and while I have no issues with that, I am kind of a purist and I wanted to prove to myself and to others that one should be able to make good Makgeolli without yeast. That’s the way our ancestors have done it for hundreds of years so why not us? Conclusion – Adding yeast does improve the success rate overall so if you are not a purist like me, go ahead and add it. It makes life easier. Also yeast definitely helps at warmer temperatures. However, in our most recent batch at lower temperatures, we found that the brew without yeast resulted in a sweeter brew with lower alcohol content. The one with yeast was drier and higher alcohol content (well it felt like it, I don’t have scientific proof yet) so your choice.
- Best container for Brewing – any clean lead-free, glass or food-grade plastic container works fine. Be aware that brewing can draw out chemicals from the container so be sure to use one that’s safe for brewing. Traditionally Makgeolli was made in clay jars (hangari) – like the ones you put kimchi or gochujang in – which is the most ideal as it allows the brew to breathe. But if the hangari was used in other fermentations, it may still have some flavor or smell embedded, not to mention having some different set of bacteria that may tip the balance for a good brew. So be careful when you use hangari. Non-reactive stainless steel metal containers can also work.
- What kind of water? Growing up, I heard many adults say – ‘술맛은 물맛이 좋아야..’ meaning that good wine or liquor comes from good water. I recommend filtered water or spring water. Don’t use tap water – chlorine can work against fermentation.
- Storage (slow fermentation) – the entire brew (once it’s done) can be stored up to 3-4 months in the refrigerator but it will continue to ferment and produce gas so you need to release the gas every couple of days OR use a fermentation topper that allows gas to escape.
What is Nuruk?
Nuruk 누룩 is the traditional fermentation starter used in this recipe. The traditional one is a round disc typically made from wheat or rice. These days they are usually sold in packages like this one.
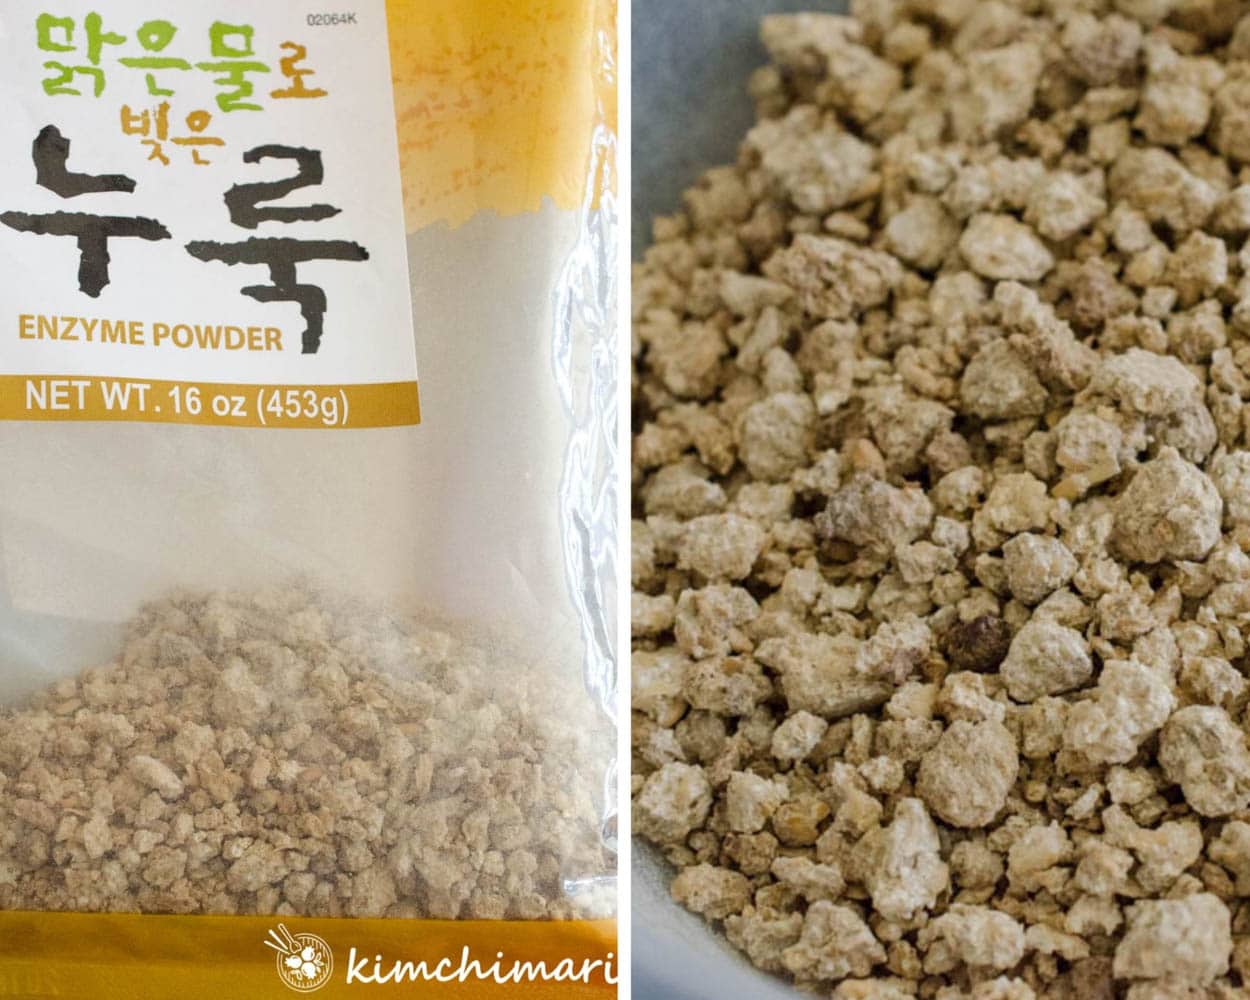
Wheat or Rice grains are ground then mixed with water then shaped into discs and then pressed to remove excess moisture. Then it is left in a warm room with hay to promote the growth of molds. It is hung to dry slowly while still fermenting. The exact shape of discs and methods differ based on different regions in Korea but the basic process is similar.
Nuruk contains yeasts, lactic acid bacteria and many enzymes (produced from molds) which determines the flavor of your fermented drink. It has all the ingredients needed to break down the starches, produce alcohol while providing an environment that ensures a healthy and safe fermented drink.
There are other nuruks made from mungbeans and barley.
Where to BUY Nuruk and other ingredients – Korean grocery stores or visit my amazon store’s Makgeolli section
Don’t have a steamer for rice?
My recommendation is to use a bamboo steamer. But if you don’t have one, you can use a rice cooker to cook the rice (but not the best). Use a bit less water, 1:0.9 rice to water ratio. Spread cooked rice on a tray and dry the rice using a dehydrator for an hour or so OR air dry for several hours. You want to dry it so the outside feels dry and a bit hard but the rice is still soft and squishy inside.
Step-by-step Instructions
Servings: 3-4 Cook Time: 10 days Difficulty: Medium
Equipment – large bowls, colander, steamer, steam liner, tray, fine linen or fine mesh filter bag, 4 liter container or jar with cover, wooden spatula or spoon for mixing, two 750 ml bottles, funnel (good to have)
Ingredients
- 1 kg Sweet Rice (Chapssal)
- 3/4 cup (or 95g) Nuruk
- 1 liter water
- 1 tsp instant baker’s yeast (optional)
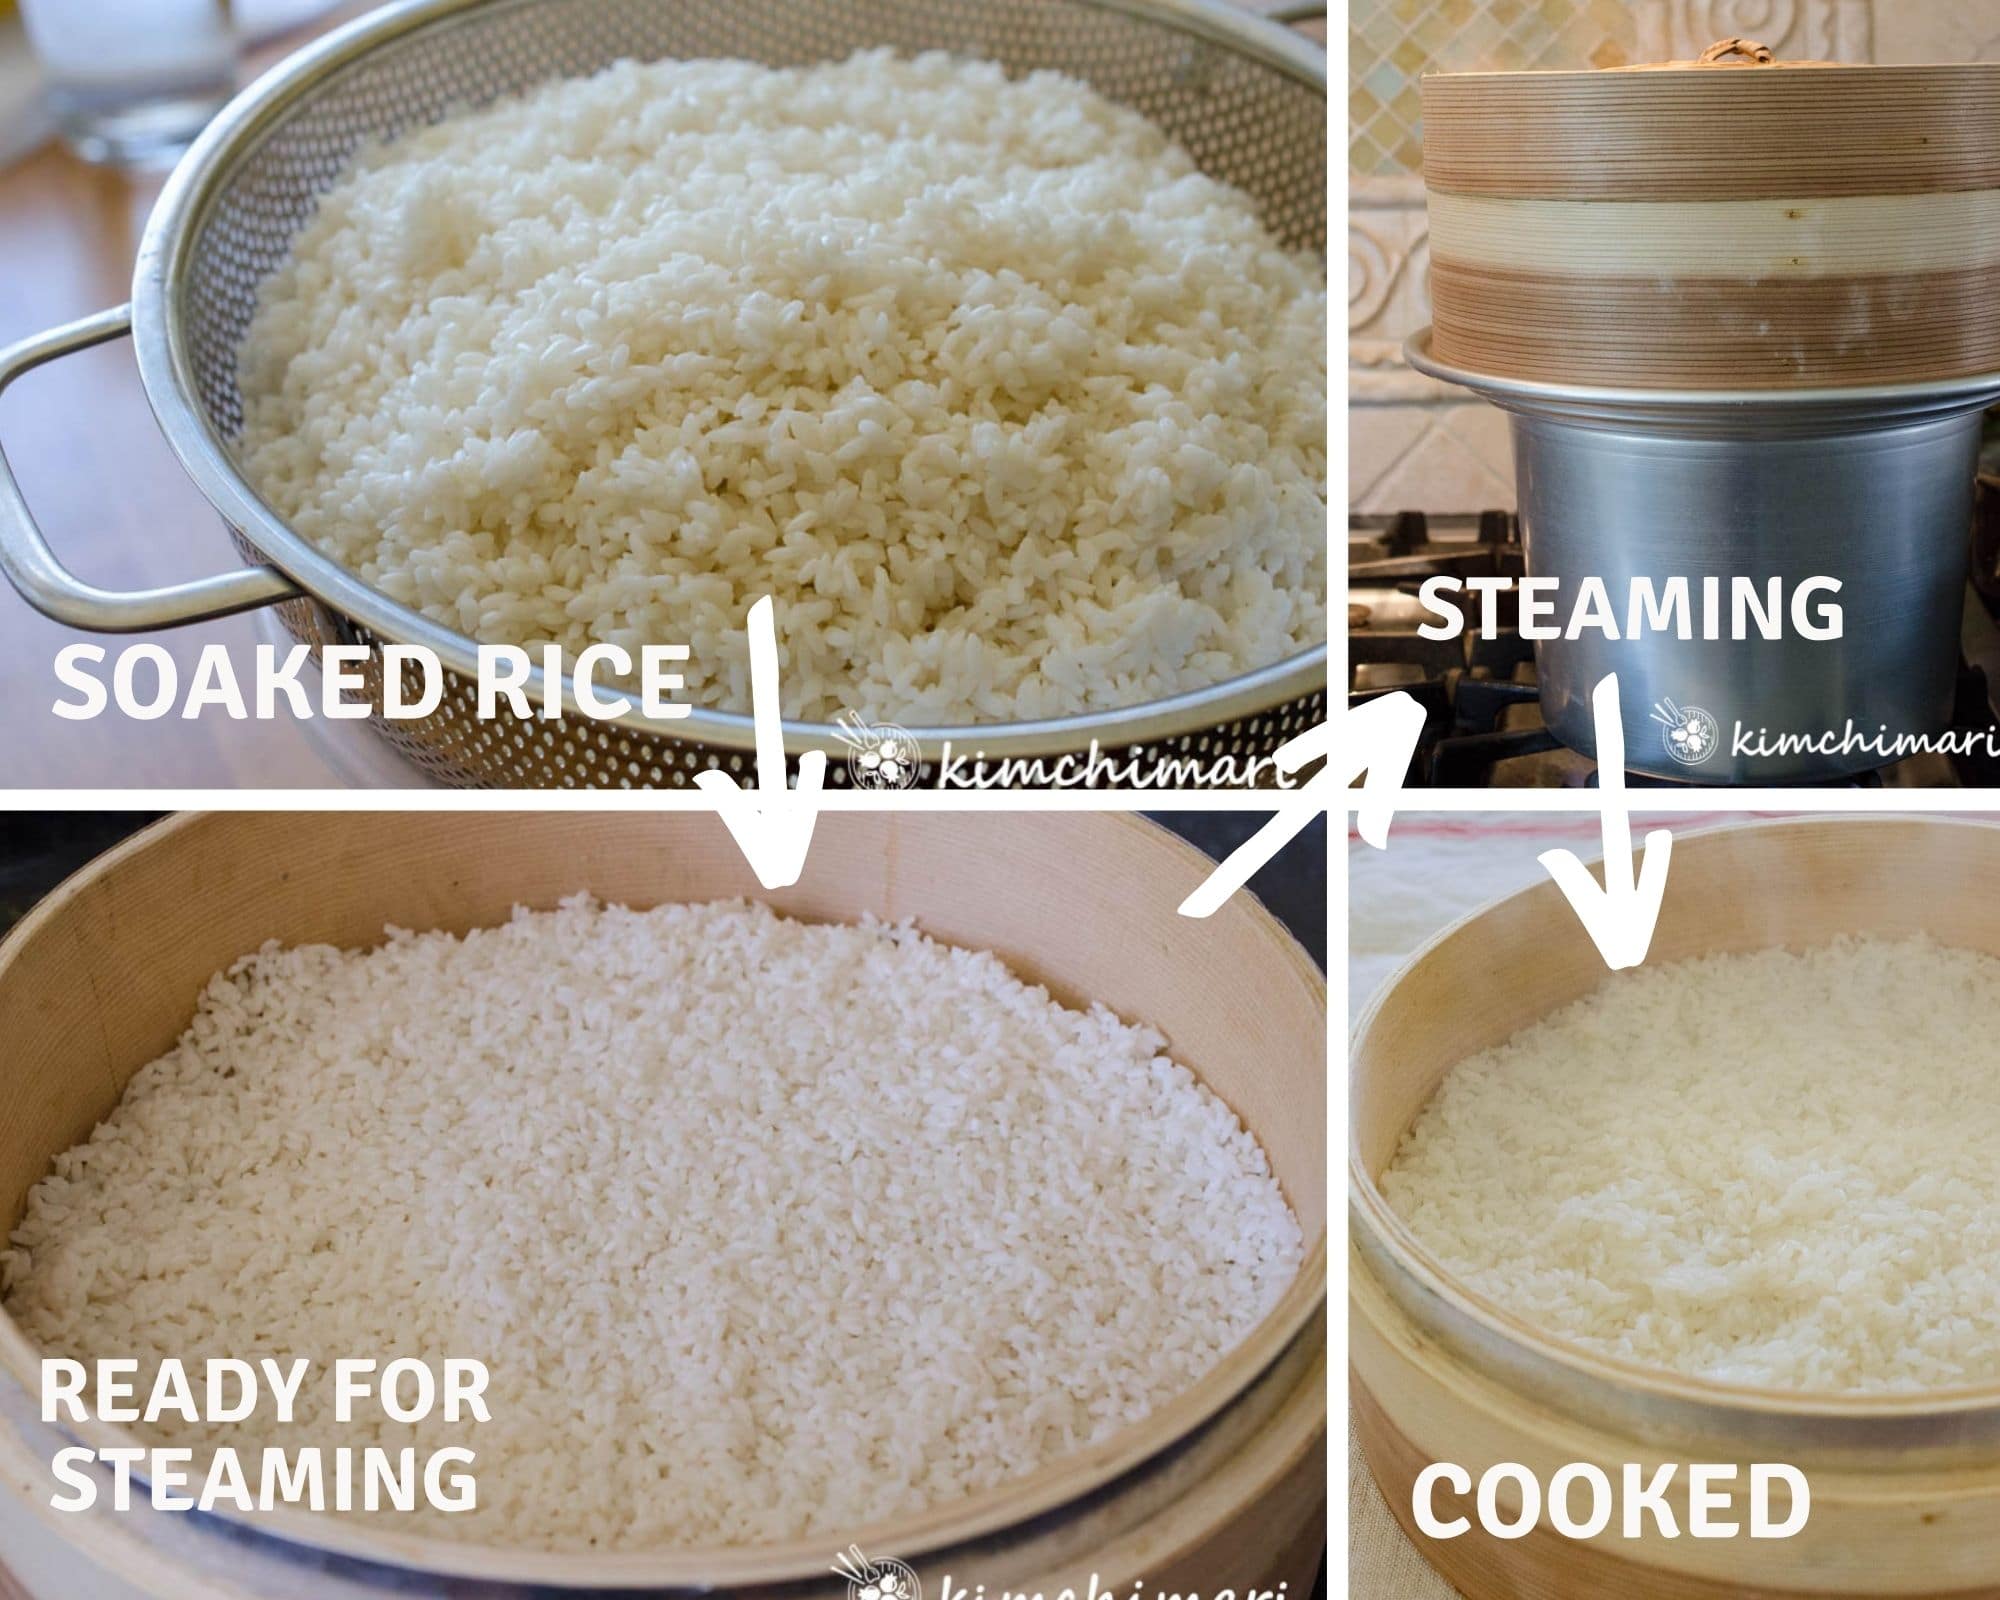
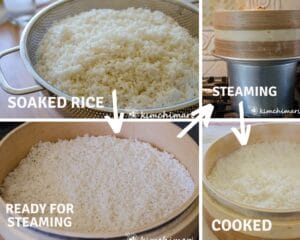
- 5 hrs BEFORE – Make Dry Rice (Godubap 고두밥) – Measure and wash sweet rice a few times in cool water until the water runs pretty clear. In the old classic Korean cookbooks, it says to wash 100 times but I’m sure the rice was also not as clean as now. 😂 So wash 4-5 times until the water is pretty clear.

- Soak rice in water for 2 hours for sweet rice, 3 hrs for short-grain rice and overnight for brown rice. You can soak longer (even up to 3 days) but change water after 8 hrs or so.
- Drain rice in a colander for 30 – 45 min. Just completely remove any excess water.
- Steaming – I use a bamboo steamer and line it with a non-stick silicone mesh (or a steam liner) and lay the rice flat as possible then steam for 40 minutes or until the amount of steam coming up through the steamer is no longer really visible.

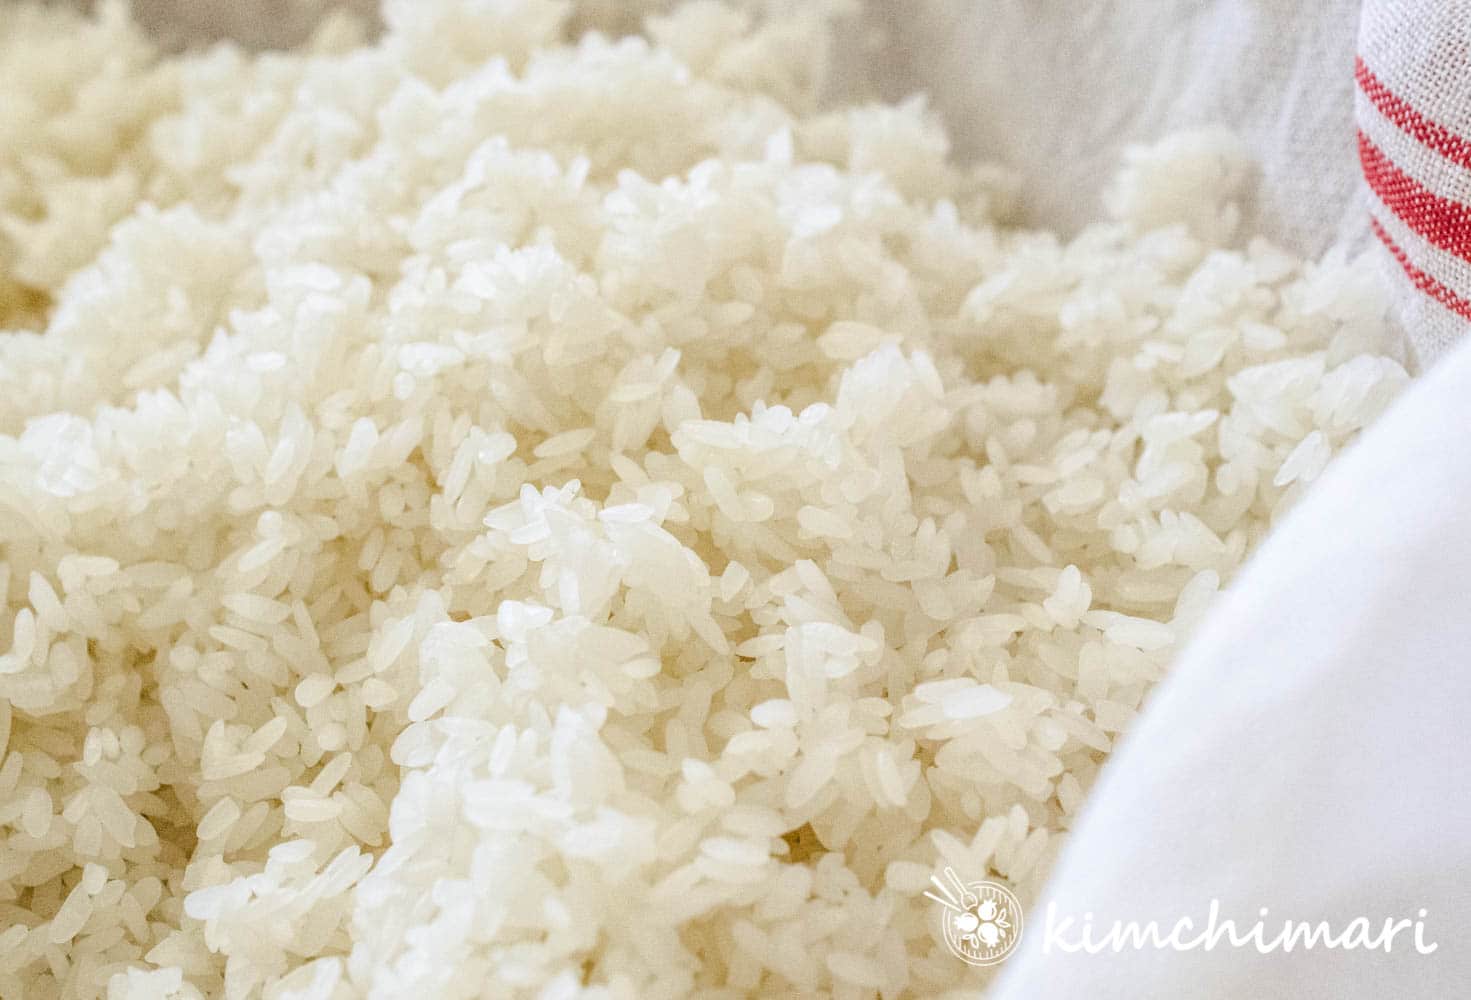
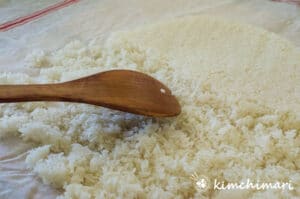
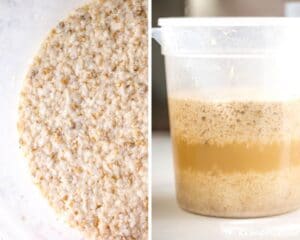
- Spread out steamed rice on a tray – while taking care not to break the rice grains. Let it cool for 1- 2 hours or so until it doesn’t feel warm to touch. It helps to overturn the rice couple times to help the cooling and drying.

- Here’s how it looks close up when it’s cooled and a little dried.
- Sanitize your container. If it’s a non-porous container like plastic and glass, use soap and water, then rinse. If using a porous clay jar or you want to be extra safe, pour some strong food-grade alcohol like vodka or Everclear and give it a swirl then discard. Let it dry completely.
- 1 hr BEFORE – measure the amount of water you are going to use for Makgeolli. I use filtered water. Bottled water is also good. Add water to your container that you will be brewing. Use warm water if you want to give it an extra boost. Add nuruk to water and let it soak for 1 hr. Break it up with your hands if you see big chunks of it. NOT a MUST but it helps to get a good start by activating the culture. Pretty similar to putting yeast in warm water first.
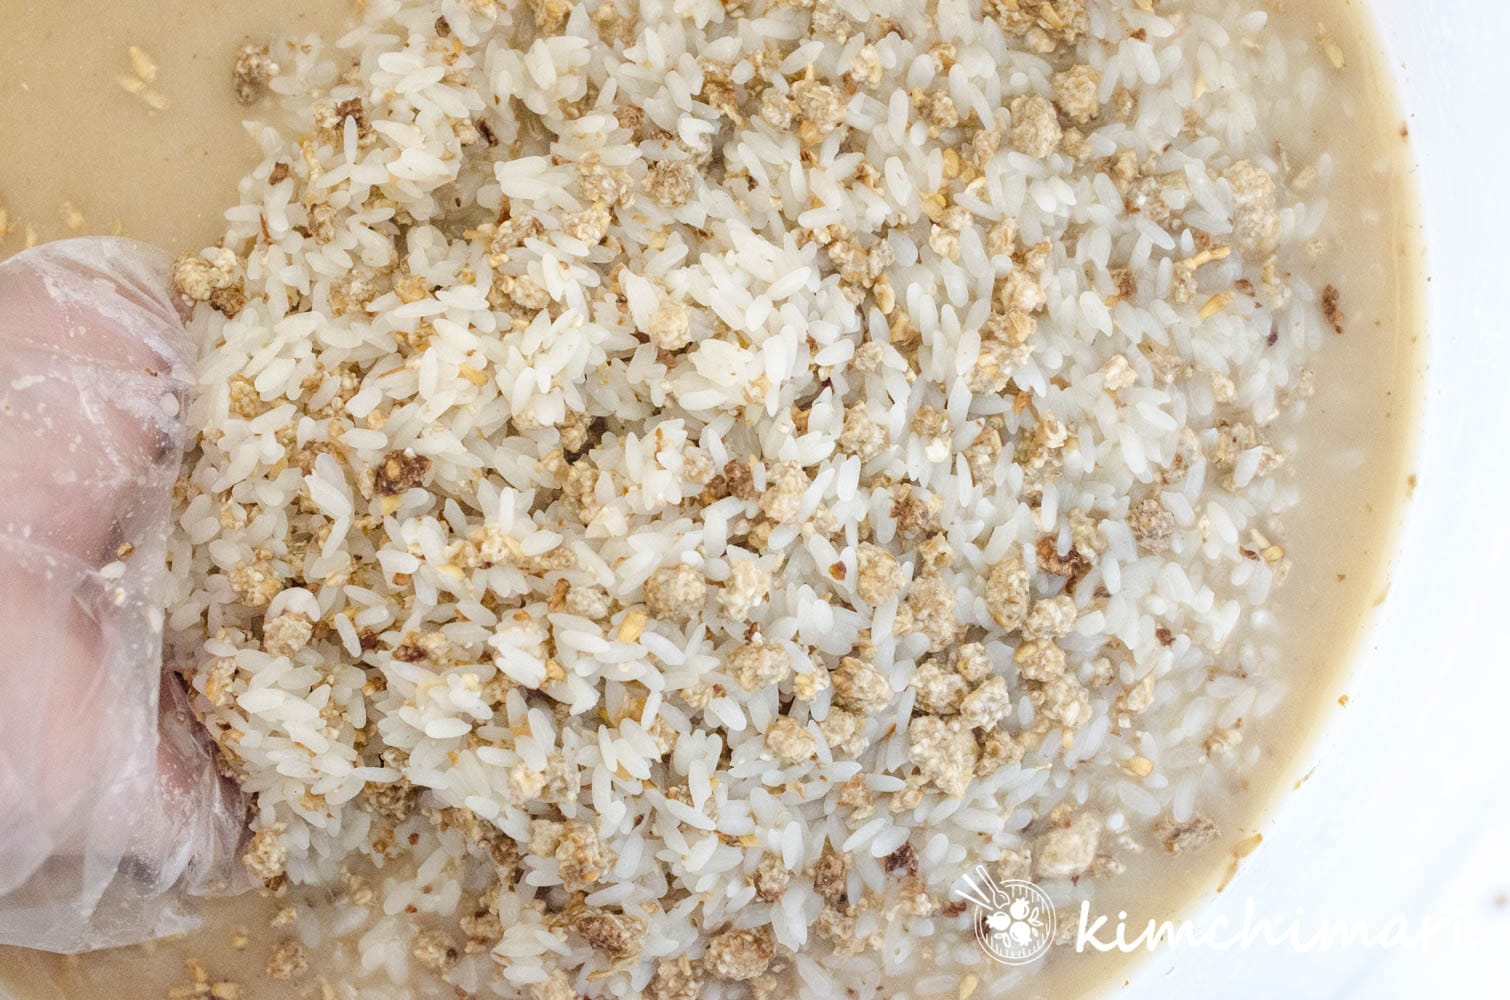
- When rice is cooled, add RICE to your Nuruk water mix in your container. Rice should be dry enough that individual grains separate easily from each other.
- With your hands, gently mix the rice, nuruk, water so that they are evenly mixed and there are no big chunks of nuruk left. Do it gently so you don’t break the rice grain. It’s best to leave each rice grain as a whole as possible but do try to mix it all well. Because the longer you mix, things get warmed up allowing the yeast and enzymes to get activated. Giving your mash a great start!
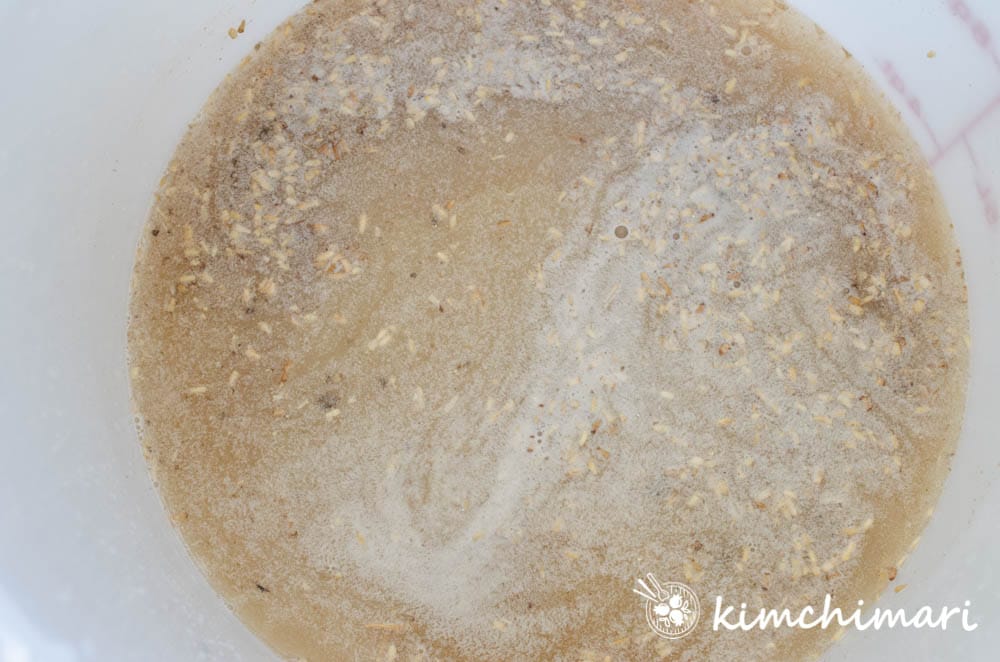
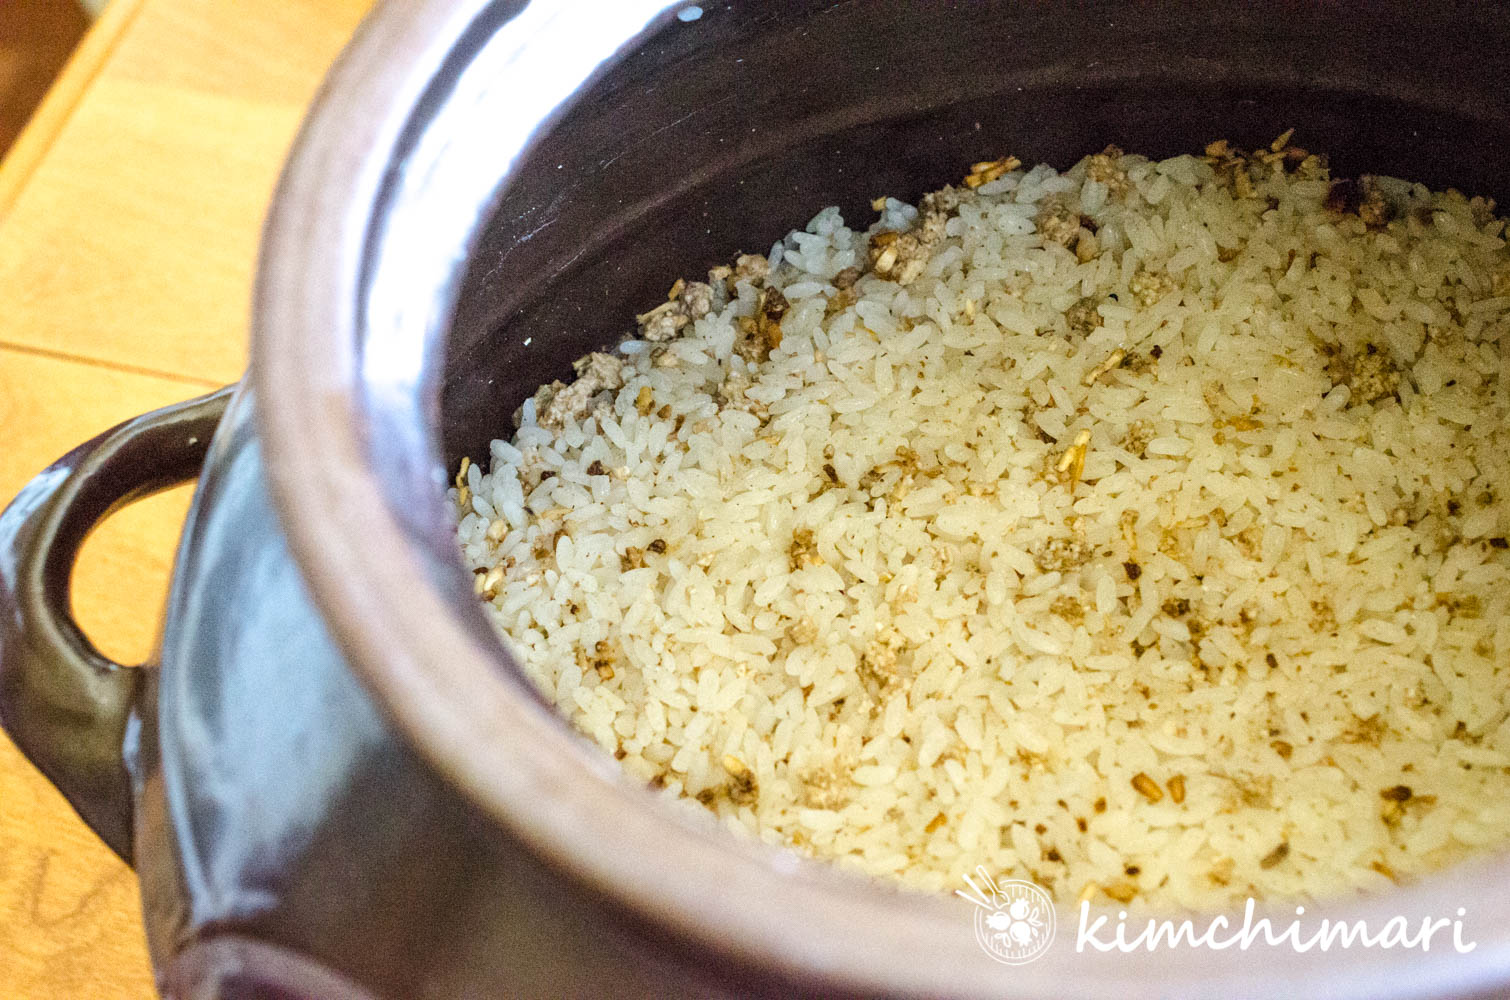
- Cover the container loosely with the lid and put the rice brew in a cool dry dark place for 10-14 days. Initially, the mix will look dry with no extra liquid.
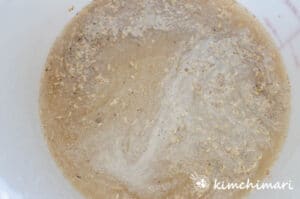
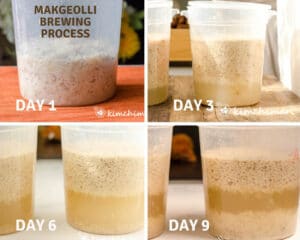
- DAY 1 – 3: keep the lid loose (as it needs oxygen), mix 2 times a day with a wooden spoon or plastic spatula. On the 1st day, it won’t be easy to mix as there’s very little liquid but just do the best you can. Closeup of Day 1.You will see more and more liquid appear each day.
- DAY 4 to Day 10 to 14, DO NOT MIX and keep the lid completely closed. But check on the change. You can open it every now and then, just don’t leave it open. In low temps (65℉), it can take up to close to 2 weeks but on average, it should take about 10 to 12 days. At higher temps close to 75℉, it may be ready even before 10 days. Rather than just depend on the number of days, you should closely watch for signs that it is ready and also do a taste test to see when you want to bottle it. Read my tips below on how to check if it’s done.
- Snapshot AT DAY 10 – Here’s a close-up of the top and side view on Day 10. I did this during California fall (Halloween time) so temps stayed below 70℉ and it could have gone a couple of days longer than above at Day 10 if we wanted to complete the brew but we decided to bottle it a bit early so we could capture the fizz. I LOVED it this way. But we had an 💥EXPLOSION!!!💥😂😝🤣 when we opened the bottle later! HAHA
- DAY 1 – 3: keep the lid loose (as it needs oxygen), mix 2 times a day with a wooden spoon or plastic spatula. On the 1st day, it won’t be easy to mix as there’s very little liquid but just do the best you can. Closeup of Day 1.
- FILTERING – Once the brewing is done, we need to filter/strain the Makgeolli. I use my Belgium Libeco linen towel or fine mesh filter bag to strain it. The brew is ready to drink at this point but I like to store in the refrigerator for a few days so it can age a little and mellow out even further.
- If bottling a bit early, remember to release the gas every couple of days or use a fermentation topper that allows gas to escape.

 Because the longer you mix, things get warmed up allowing the yeast and enzymes to get activated. Giving your mash a great start!
 You will see more and more liquid appear each day.
 I did this during California fall (Halloween time) so temps stayed below 70℉ and it could have gone a couple of days longer than above at Day 10 if we wanted to complete the brew but we decided to bottle it a bit early so we could capture the fizz. I LOVED it this way. But we had an 💥EXPLOSION!!!💥😂😝🤣 when we opened the bottle later! HAHA
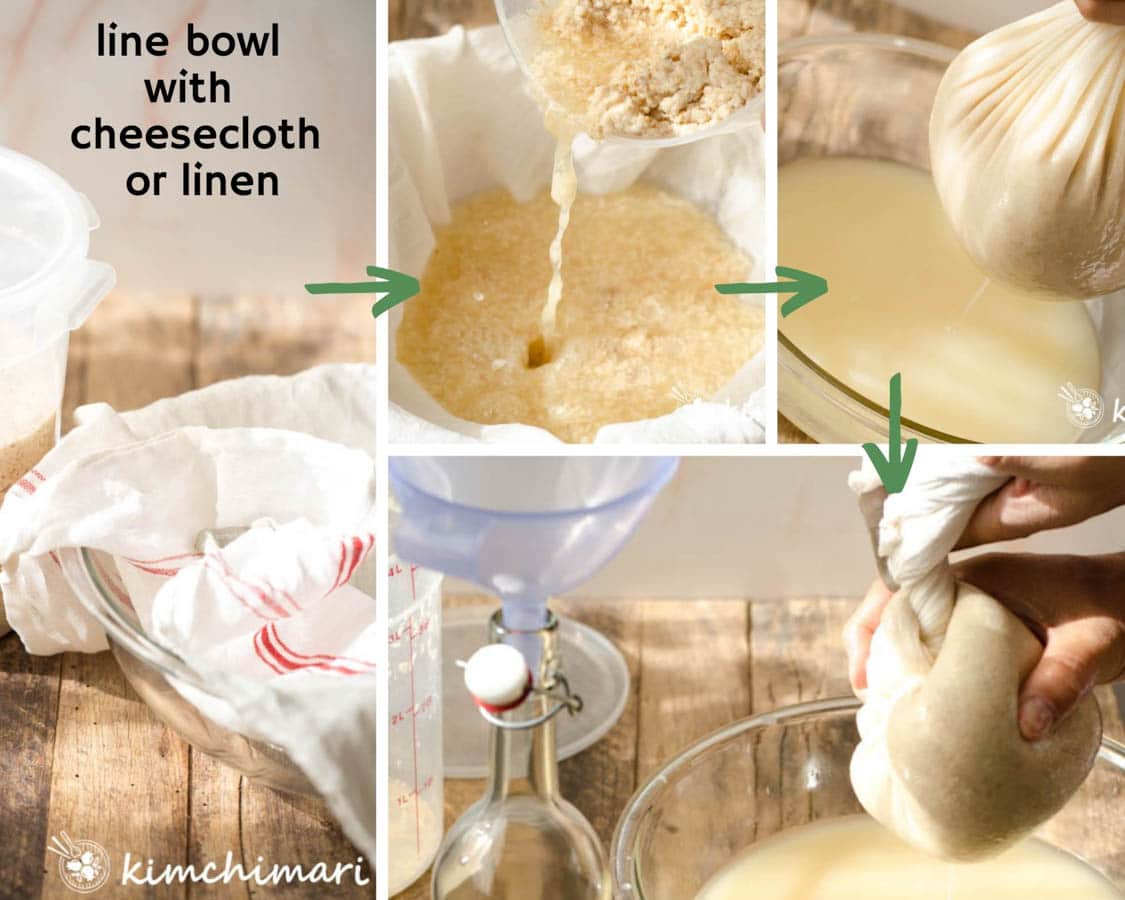 Once the brewing is done, we need to filter/strain the Makgeolli. I use my
 Signs that Brewing is complete
Various factors affect the brewing speed so it’s best to look for signs and do a taste test to see if the brew is ready instead of just blindly counting the days.
Signs that Makgeolli brew is complete (it can be any ONE of the signs below for it to be complete). Taste along the way and stop when you think is ready
- almost no or very little signs of bubbling – visually and audibly
- 3 distinct layers with a layer of pure liquid in the middle and rice on top and bottom but don’t just bottle it as soon as you see 3 layers, taste first. You may want to ferment it for another day or two before you complete it. But this is not a MUST sign.
- do a smell and taste test – This is the most important test of all. From about 7 days on, taste to see how you like it. The sweetness will diminish and sugars will turn into alcohol while the sour taste will increase at the same time. You want to find the point where it tastes the best to you. It will also have a bit of a zing but it will also decrease as it starts to sour. Most consider an ideal point when it’s just slightly sour, sweet but has a good amount of alcohol content. If it smells like acetone then unfortunately, the bad bacteria have won and your brew will not taste very good.
What to do with strained rice sludge?
The yellowish rice and nuruk sludge or paste is called Jigaemi 지게미 and it can be used to make Moju (a drink flavored with honey, ginger and cinnammon), to use in baking and also as a face mask! Try mixing Jigaemi with some honey and use as a face mask – it’s supposed to get rid of impurities in your skin. 😍😛
Have fun making Makgeolli and Serve for the Holidays!
As it’s Christmas next week, I thought it would be fun for everyone to enjoy making this wonderful, simple home-brewed drink at home for the Holidays. And I had some fun taking photos of my Makgeolli and some Fish Jeon in holiday style.🎄🥂🎄
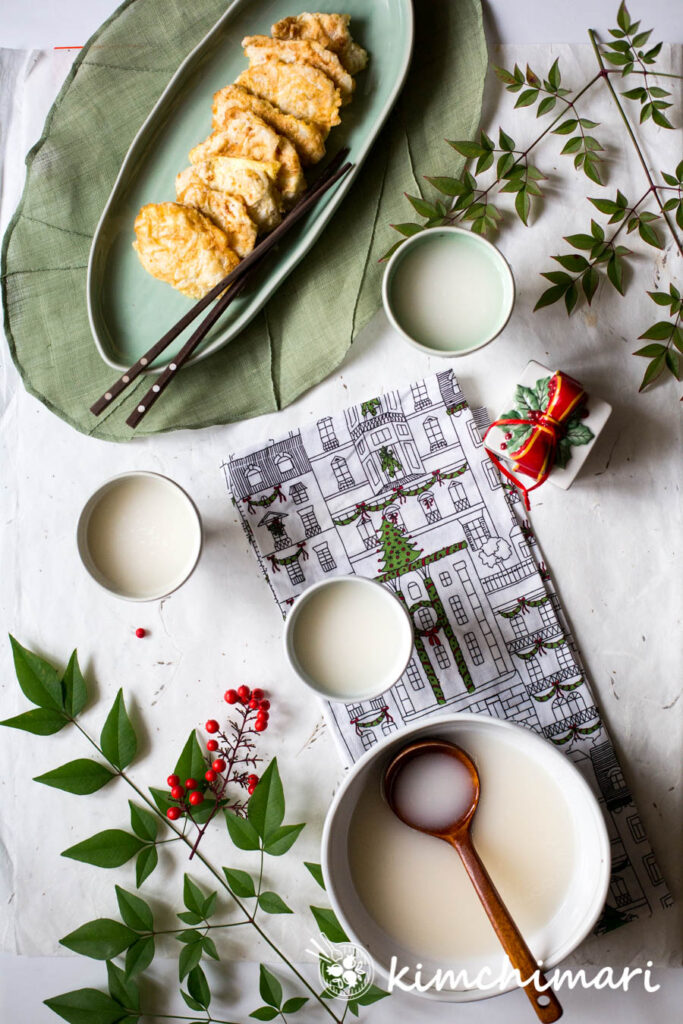
Hope you can enjoy them with your friends and family! Happy Holidays!
How to Dilute Makgeolli
The first time I learned that commercially sold ones were a diluted version of the original, I was shocked and disappointed. And once I tasted the home-brewed version, I was even more sad.. why did we lose this fabulously complex flavors through commercialization??
But, that’s just me. 😝Everyone’s palate is different, so feel free to explore this option. Diluting with water does make it less thick and lowers the alcohol content – which you may prefer.
Try diluting a small portion of the finished wine with 2:1 ratio (wine:water) and then adding sugar or other sweeteners to taste. Or alternatively, you can add some ice when you serve it. About 2 Tbs of sugar to this recipe which yields about 1.3 litres (5.5 cups) tasted good to me.
Serving Suggestions
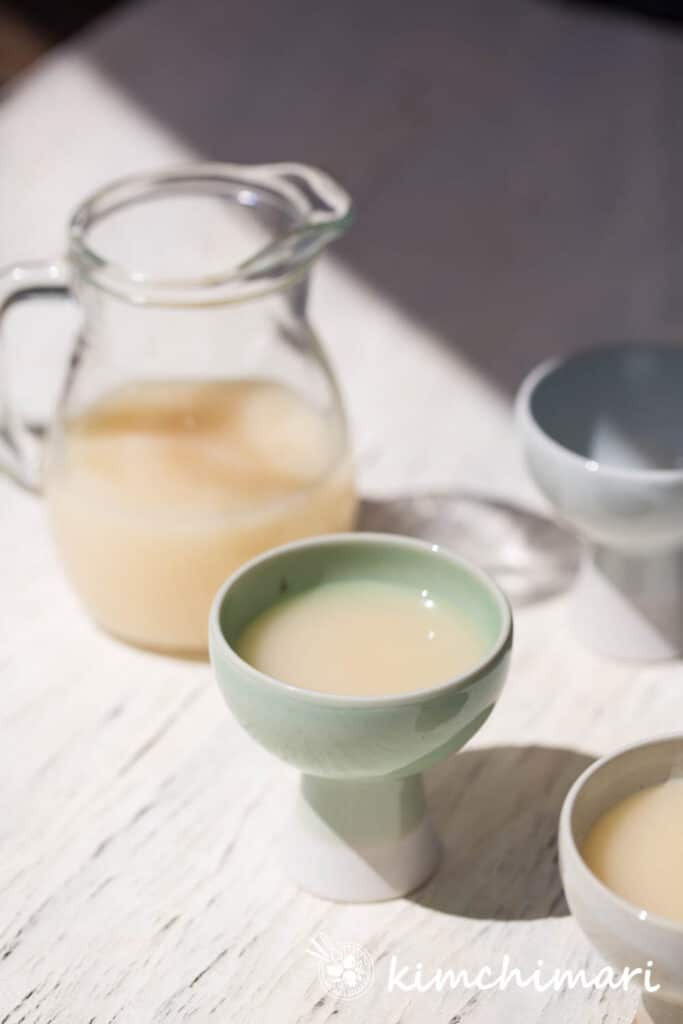
- Serve it COLD for best flavor and zing
- There will be sediments when you open the bottle. Pour just the top clearer liquid to enjoy Cheongju 청주 or shake + mix well to enjoy as Wonju 원주 (original).
- Pair with jeons like Bindaetteok, Kimchi Jeon, Fish Jeon, Potato pancake.. any kind of jeon. This is how Korean farmers enjoyed it as an afternoon snack.
- Wonderful with Korean BBQ meats. Subscribe to my blog and get my free BBQ cookbook or check my BBQ marinade recipes here.
- Make Ice Cream (no machine needed)! Here’s my recipe.

Makgeolli (Korean Rice Wine)
Ingredients
- 1 kg sweet rice (glutinous rice)
- 3/4 cup Nuruk starter 3/4 cup is about 95 g
- 1 liter water
- 1 tsp baker's yeast (optional)
Optionally needed to dilute finished Makgeolli
- 650 ml water
- 2 Tbsp sugar
Instructions
Prepare Rice (5 hrs before)
- Make Dry Rice (Godubap 고두밥) – Wash rice a few times in cool water until the water runs pretty clear. In the old classic Korean cookbooks, it says to wash 100 times but I'm sure the rice was also not as clean as now. 😂 I think I wash about 5 times or so.

- Soak rice in water for 2 hours for sweet rice, 3 hrs for short-grain rice and overnight for brown rice. You can soak longer (even up to 3 days) but change water after 8 hrs.
- Drain rice in a colander for 30 – 45 min. Just completely remove any excess water.
- Steaming – I use a bamboo steamer and line it with a non-stick silicone mesh and lay the rice then steam for 40 minutes or until the amount of steam coming up through the steamer is no longer really visible.

- Spread out steamed rice on a tray so it can cool. Cool for 2 hrs or so until it's not warm to touch.


Prepare Container
- Sanitize your container by using soap and water then rinse if it's a non-porous container like glass or plastic. If you are using porous clay hangari jar or want to be extra safe, pour some strong alcohol like Vodka or Everclear and give it a swirl then discard. Let it dry completely.
Prepare Nuruk (starter) and water
- 1 hr BEFORE – measure the amount of water you are going to use for Makgeolli. I use filtered water. Bottled water is also good. Add water to your container that you will be brewing in. Use warm water if you want to give it an extra boost. Add nuruk to water and let it soak for 1 hr. Break it up with your hands if you see big chunks of it. NOT a MUST but it helps to get a good start by activating the culture. Pretty similar to putting yeast in warm water first.
Make Makgeolli
- When rice is cooled, add RICE to your Nuruk water mix in your container. Rice should be dry enough that individual grains separate easily from each other.
- With your hands, gently mix everything so that they are evenly mixed and there are no big chunks of nuruk left. Try not to smush or break the rice grains. It's best to leave each rice grain as whole as possible but do try to mix it all well. Because the longer you mix, things get warmed up allowing the yeast and enzymes to get activated. Giving your mash a great start!
- Cover the container loosely with the lid and put it in a cool dry dark place for 10-14 days. Initially, you should not see any extra liquid.

DAY 1 of Brewing
- DAY 1 – 3: keep the lid loose (as it needs oxygen), mix 2 times a day with a wooden spoon or plastic spatula. On the 1st day, it won't be easy to mix as there's very little liquid. But that's how it should be. You will see more liquid appear in the mix each day.

Day 4+
- DAY 4+, up to 10 to 14 days, don't mix and keep the lid completely closed. But check on the change. In low temps (65℉), it can take up to close to 2 weeks but on the average it should take about 10 days. At higher temps close to 75℉, it may be ready even before 10 days. Rather than just depend simply on the the time, you should closely watch for signs that it is ready and also do a taste test to see when you want to bottle it. Read my tips below on how to check if it's done.
Filter
- Once the brewing is complete (or when you want to bottle), we need to filter the Makgeolli. Use a fine linen cloth or mesh filter bag to filter the liquid. The brew is ready to drink immediately but I like to store in the refrigerator for a few days so it can age a little and mellow out even further.

How to dilute (OPTIONAL)
- Optionally, you can dilute the finished Makgeolli by mixing with water (1/2 amount of total wine) and added sugar (about 2 Tbs for 1 batch using 1 kg rice). This will produce a drink similar to ones sold at stores. Less thick and with similar alcohol content of 6% and sweeter flavor. I personally don't like to do it but you can try a little first and see if you want to do it.
How to serve Makgeolli
- Makgeolli is best when served cold. Normally, you will see sediments at the bottom of the bottle and you can mix it before serving for a milky texture or you can just choose to drink the clearer Cheongju on top (which we kind of like to do – also less calories).

Equipment
- large mixing bowls
- tray
- wooden spatula or spoon
- colander
- steamer, steam liner
- fine linen or fine mesh filter bag
- 4 liter container or jar with cover
- two 750 ml bottles
- funnel (good to have)
Tips & Notes:
- Makes about 1.3 to 1.4 litres (5.5 cups).
- Note, nutrition is not accurate as this calculator doesn’t know how to calculate a fermented drink. FYI, the most popular Guksundang notes it’s 43 kcal for 100ml serving.
-
Various factors affect the brewing speed so it’s best to look for signs to see if the brew is ready instead of just blindly counting the days.
Signs that Makgeolli brew is complete –
- almost no or very little signs of bubbling – visually and audibly
- 3 distinct layers with a layer of pure liquid in the middle and rice on top and bottom but don’t just bottle it as soon as you see 3 layers, taste first. You may want to ferment it for another day or two before you complete it
- do a smell and taste test – I think this is probably the most important test of all. From about 7 days on, taste to see how you like it. The sweetness will diminish and sugars will turn into alcohol while the sour taste will increase at the same time. You want to find the point where it tastes the best to you. It will also have a bit of a zing but it will also decrease as it starts to sour. Most consider an ideal point when it’s just slightly sour, sweet but has a good amount of alcohol content.
- If you bottled your Makgeolli early while it’s still quite actively bubbling, remember to release the gas every couple of days or use a fermentation topper that allows gas to escape. Or it can burst!!


Very interesting i wanna try this makgeolli. Just before i will start. In case thr room temperature drops to 15degrees celsius does it matter? I drank 750ml (장수) makgeolli everyday. Does is it worth to DIY because of the health benefits? Thank you
Hi Sulit, if the temperature drops to 15 Celsius, it will just take longer – probably as long as 20 days. If it continues to stay between 15-18 Celsius. I would say making your own at home is definitely better since there are live probiotics whereas the store sold ones, they may always have live cultures. Good luck!
It’s day 11 already and i didn’t see any separation of liquid from the solid ingredients. And the smell is like almost vinegar. Is it okay and safe?
Hmm.. if the smell is like almost vinegar then it’s probably too far gone. You can try tasting a bit – but if it smells like vinegar then it probably is too sour already. Sometimes, you have to stop even though it doesn’t separate. As I share in my post. Sorry, hopefully it works better next time!
Simple. Foolproof. Delicious.
Thank you soo much!! Appreciate the 5 stars!
Just trying this recipe now! you mentioned using the Jigaemi to make mogu – do you have a recipe for this i could try?
Yes you can but I’m afraid I don’t have the recipe for it. You basically cook a tea of jujube, pear, ginger, licorice and then add the jigaemi reduce it then add honey to taste. Filter before you drink. Hope that helps.