• Skip to primary navigation
  • Skip to footer navigation
  • Skip to footer-bottom navigation
  • Skip to privacy navigation
  • Skip to recipes navigation
  • Skip to main content
  • Skip to primary sidebar

Kimchimari

Authentic Korean recipes even YOU can cook!

Free Korean BBQ Cookbook! TAP HERE to GET IT
POPULAR: our 10 takeout favorites
Facebook Instagram Pinterest Twitter YouTube

Authentic Korean Recipes Anyone Can Cook

  • New to Korean cooking? Start Here
  • Recipes
    • Recipe Index
    • Recipes by Alphabet
    • Latest on the Blog
  • Ingredients
    • Korean Ingredient Glossary
    • Pantry Essentials
    • Pantry – Beyond Essentials
    • Korean Ingredients in Depth
  • How To
    • Cooking Basics + Tips
    • Buy + Use
    • Meal Plan
    • Make from scratch
    • Korean Veg Garden
  • Travel
  • Videos
    • Video Recipes
    • Web Stories
  • About
    • About Me
    • Press Interviews and Mentions
  • New to Korean cooking? Start Here
  • Shop
  • Free Korean BBQ Cookbook! TAP HERE to GET IT
  • Facebook Instagram Pinterest Twitter YouTube
Home Side Dishes

Sweet and salty lotus roots (연근조림 Yeonkeun Jorim)

gf df vg kf
Posted:12/23/201114 Comments
Recipe Print
sweet and salty braised lotus roots

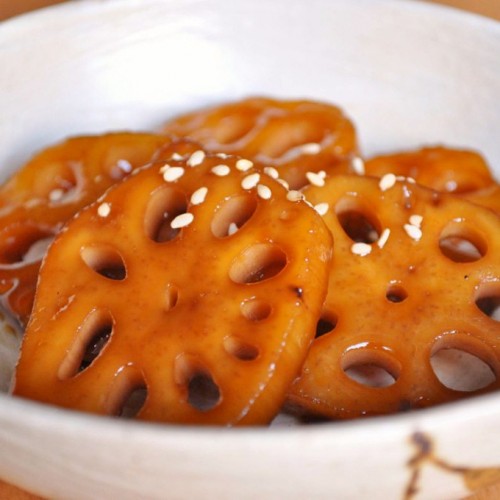
So what do these braised lotus roots (연근조림 Yeongeun/Yeongn/Yeonkeun Jorim) remind me of? It totally brings back fond memories from my high school days, eating lunch boxes with my friends, sharing our banchan (반찬 – side dish) together. And this was certainly one of my top favorites to have in the lunch box. It is also a commonly served side dish at many Korean restaurants. But most often than not, the  lotus roots jorim at restaurants are either too salty, not sweet enough or too sweet and the texture is usually very gummy. They taste best when they are slightly crunchy, salty and sweet, all at the same time.

Lotus roots are also well known for its health benefits. First of all, it’s very low calorie (3.5 oz is only 70 calories). It is a great source of fiber and vitamin C. It also has good amounts of vitamin B complex and even minerals like copper, zinc, magnesium and manganese.

This recipe was requested by my niece MJ – to whom I owe many thanks for all her wonderful feedback on my blog throughout this year.


Servings: 8                                 Cooking Time: 30 min                                            Difficulty: Easy

Ingredients

1 package of lotus roots is about 4 C in volume
  • one 16 oz pkg
  • blanched lotus roots (about 4 C)
  • 1 T + 1tsp vegetable oil
  • 4 T + 2tsp soy sauce
  • 3 T sugar
  • 1 T + 1tsp cooking rice wine (sake is good)
  • 1 T rice malt syrup
  • 2 T maple syrup
  • 3/4 C + 1 tsp water
  • pinch of sesame seeds as garnish

Directions

1. I could not find any fresh lotus roots at my store so I bought this packaged lotus root that comes already blanched. If you can buy fresh lotus roots, that’s probably better but I think this is just as good. For fresh lotus roots, just wash, peel, slice them into 1/4 inch thickness and then blanch them in boiling vinegar water (1 T vinegar to 4-5 C water).

package of blanched lotus roots
16 0z package of blanched lotus roots

The packaged lotus roots already come in vinegar water so make sure you drain it, rinse it a couple times and then dry off any excess water by placing them on sheets of paper towel.


rinsed lotus roots
rinsed lotus roots (yes, that’s my dog on the right) – I put my bowl on the floor for better lighting and when I took the picture, she was already in it!


wipe water off of lotus roots on paper towel

2. On medium high heat, add the 1 T+ 1tsp of oil in a pot and lightly saute the lotus roots for 5 min.

3. Make the sauce by mixing the soy sauce, sugar, cooking wine, water and malt syrup. Add the sauce to the pot and bring to a boil on medium high heat.

Add sauce to lotus roots

4. Once it starts to boil, reduce the heat, cover with a lid and let it simmer for 20 minutes. Stir the lotus root slices every few minutes to make sure they get evenly coated with the sauce. It should look something like this..

lotus roots simmering in sauce

5. For the final step, take off the lid and add 2 T maple syrup. Let the sauce reduce further (so that it barely covers the bottom of the pot) in low heat for 5-7 minutes. This will add a nice glaze to the jorim. Stir the lotus roots often to glaze them evenly.

yeongeun (lotus roots) jorim is now done

And there it is! Sprinkle some roasted sesame seeds on top. These lotus roots will be just sweet and salty enough to make a great side dish to any Korean meal. If the lotus roots comes out chewy or gummy, you probably cooked it too long.


Follow along on social for more Korean recipe inspiration!
  • Pinterest
  • Facebook
  • Instagram
My Newsletter
Print
4.67 from 6 votes
sweet and salty braised lotus roots

Sweet and Salty Lotus Roots (Yeonkeun Jorim)

Braised lotus roots are a popular Korean side dish. They taste best when they are slightly crunchy, salty and sweet all at the same time.
Prep: 5 minutes
Cook: 30 minutes
Total Time: 35 minutes
serves: 8

Ingredients

  • 16 oz blanched lotus roots (about 4 cups / 1 L)
  • 4 tsp vegetable oil
  • 4.6 Tbsp soy sauce
  • 3 Tbsp sugar
  • 4 tsp cooking rice wine (sake is good)
  • 1 Tbsp rice malt syrup
  • 2 Tbsp maple syrup
  • 3/4 cup + 1 tsp water
  • Pinch of sesame seeds as garnish
US Customary - Metric

Instructions

  • For fresh lotus roots, just wash, peel, slice them into 1/4 inch thickness and then blanch them in boiling vinegar water (1 Tbs vinegar to 4-5 cups water).
  • On medium high heat, add the 1 Tbs + 1tsp of oil in a pot and lightly saute the lotus roots for 5 min.
  • Make the sauce by mixing the soy sauce, sugar, cooking wine, water and malt syrup. Add the sauce to the pot and bring to a boil on medium high heat.
  • Once it starts to boil, reduce the heat, cover with a lid and let it simmer for 20 minutes. Stir the lotus root slices every few minutes to make sure they get evenly coated with the sauce. 
  • For the final step, take off the lid and add 2 Tbs maple syrup. Let the sauce reduce further (so that it barely covers the bottom of the pot) in low heat for 5-7 minutes. This will add a nice glaze to the jorim. Stir the lotus roots often to glaze them evenly.
  • Sprinkle some roasted sesame seeds on top. These lotus roots will be just sweet and salty enough to make a great side dish to any Korean meal. 
  • You can keep yeonkeun jorim in the fridge for several days up to a week. Reheating is not necessary. They taste great at room temperature.

Tips & Notes:

  • I could not find any fresh lotus roots at my store so I bought packaged lotus root that comes already blanched. If you can buy fresh lotus roots, that’s probably better but I think this is just as good. The packaged lotus roots already come in vinegar water so make sure you drain it, rinse it a couple times and then dry off any excess water by placing them on sheets of paper towel.

Nutrition Information:

Calories: 101kcal (5%)| Carbohydrates: 19g (6%)| Protein: 2g (4%)| Fat: 1g (2%)| Saturated Fat: 1g (6%)| Sodium: 480mg (21%)| Potassium: 326mg (9%)| Fiber: 2g (8%)| Sugar: 10g (11%)| Vitamin C: 24.9mg (30%)| Calcium: 33mg (3%)| Iron: 0.7mg (4%)
Author: JinJoo Lee
Course:Side Dish
Cuisine:Korean
Keyword:banchan, lunchbox, sweet and salty, vegan, vegetables
KoreanCategory:Jorim (조림)
Did You Make This?I love seeing what you’ve made! Tag me on Instagram at @Kimchimari or #kimchimari and don’t forget to leave a comment & rating below!

Storage

You can keep yeonkeun jorim in the fridge for several days up to a week. Reheating is not necessary. They taste great at room temperature.

Lunchboxes

Having made this dish, I was inspired to make a lunchbox from the yeonkeun jorim and other leftover banchan I had in the fridge. On the right half – I found some leftover egg garnishes from a dduk gook we had couple days ago, some sauteed aster caber (취나물 chwinamul) and dried radish (무우말랭이 moo malengi). Because this lunchbox has only one partition, I created my own partitions by molding some tin foil into little square boxes. This is how moms used to separate banchan in their children’s lunchboxes in Korea. Otherwise, it can become one big bibimbab by the time you get to school! On the left half – I put some rice with wild grains and some leftover chicken cutlet w/ tonaktsu sauce on top. All of these can be eaten at room temperature so no need to heat anything. The combination of the savory, salty, sweet and a touch of spiciness really made this lunchbox simply divine!

Korean lunchbox (rice, chicken cutlet, chwinamul, lotus roots, egg, moo malengi)
perfectly glazed yeongeun jorim
perfectly glazed lotus roots (yeonkeun jorim)

Similar Recipes

  • Korean Sweet and Salty Soybeans
    Sweet and Salty Soybeans (콩자반 Kongjaban)
  • Yakwa cooling on rack
    A Sweet Gift for Korean New Year
  • Sweet Brown Rice Mini Bundt Cakes and Cakelettes arranged on white marble
    Sweet Rice Mini Bundt Cake with Freshly Milled Sweet Rice Flour
  • tofu braised soy sauce (dubu jorim)
    Tofu Recipe with Soy Mirin Sauce (Dubu Jorim 두부조림)
Previous Post
Next Post

Reader Interactions

Leave a Review Cancel reply

I LOVE hearing from you! Submit your question or recipe review here. Your email address will not be published. Required fields are marked *

Rate this recipe:


This site uses Akismet to reduce spam. Learn how your comment data is processed.

14 Comments
  1. Jessica says

    Posted on 31 December 2020 at 5:31 pm

    Hi! How come we add 3/4 of water to the sauce? Mine turned out very soupy. I looked at some other recipes online and they do not add any water

    Reply
    • JinJoo says

      Posted on 1 January 2021 at 1:31 pm

      It should have reduced quite a bit – sorry it didn’t turn out as you wanted. You can try to reduce it further even now. Thank you.

      Reply
    • Alison says

      Posted on 3 March 2022 at 11:21 am

      I’ve noticed that most jorim recipes add water. The results are usually too soupy for me. Maybe I don’t have the heat up high enough. If the vegetables are tender and cooked, the soupy sauce is great over rice. Otherwise, I sometimes reduce or eliminate the water.

      Reply
      • JinJoo says

        Posted on 3 March 2022 at 11:32 am

        This recipe certainly should not end up soupy – yes, perhaps the heat was not high enough. Good that you reduced it. Enjoy!

Older Comments

Primary Sidebar

JinJoo from KimchiMari

Welcome

Hi! I'm JinJoo! Thank you for visiting my Korean Food blog where I share detailed Authentic Korean recipes that even YOU can cook!

My Story

browse by type

gf Gluten Free df Dairy Free pc Pressure Cooker Recipes vg Vegan lc low carb <30 30min or less kf Kid-Friendly ls low-salt
  • by Course
    • Drinks
    • Soup+Stew
    • Appetizers
    • Salads
    • Main Dishes
    • Side Dishes
    • Desserts and Snacks
  • by Ingredient
    • Beef
    • Chicken
    • Pork
    • Seafood
    • Rice
    • Noodles
    • Tofu
    • Vegetables
    • Egg
    • Paste/Sauces
  • by Korean Basics
    • Eumryo 음료
    • Bap 밥
    • Bokkeum 볶음
    • Gui 구이
    • Guk 국
    • Hangwa 한과
    • Jang 장
    • Jeon 전
    • Jeongol 전골
    • Jjigae 찌게
    • Jjim 찜
    • Jorim 조림
    • Kimchi 김치
    • Myeon 면
    • Namul 나물
    • Tteok 떡
  • by Type
    • Easy Meals
    • 30 Minutes or Less
    • Kid-Friendly
    • Lunchboxes
    • Condiments and Sauces
    • Cooking for One
    • Street food
    • Pressure Cooker Recipes
Free Korean BBQ Favorites ebook
free recipe book!

Join to get my FREE cookbook + monthly newsletters + recipe updates!

join now!

Nutritional facts, MSG & gluten free

Nutritional Facts in my recipe cards are provided PER SERVING and it’s an estimate and may not be accurate. Due to different brands of ingredients having different nutritional values, the values I provide here may be different from your preparation.

– Gluten-Free recipe assumes you are using gluten-free soy sauce (since many soy sauces contain gluten or wheat) and/or gluten-free gochujang.

– MSG & Corn Syrup FREE – these are never used in my recipes

Opens in a new window Opens an external site Opens an external site in a new window
baked chicken on parchment paper with onions caramelized

닭고기

Chicken

소고기

Beef

Spicy Pork BBQ - Korean Pork Bulgogi

돼지고기

Pork

Garlic Scape Stir Fry with Shrimp (Maneuljjong Bokkeum 마늘쫑 볶음)

해산물

Seafood

Soondubu Jjigae or Soft Tofu Stew

두부

Tofu

곡식

Rice

READER FAVORITES

Trending Now

Mini Kimbap tray - kimbap two ways

Mini Kimbap (Mayak Kimbap) with Carrot or Cucumber

Chicken Bulgogi Rice

Easy Chicken Bulgogi (Dak Bulgogi) for Korean BBQ

After stew has boiled for 15 min with cheese melted on top

Budae Jjigae (Korean Army Stew)

Korean Sweet Pancake - Hotteok/Hodduck (호떡) www.kimchimari.com

Hotteok (호떡)- Korean Sweet Dessert Pancake

featured on
ny times logo
  • COOK
    • Recipe Index
    • Pantry Items
    • Videos
  • LEARN
    • Starter Guide
    • Korean How To’s
    • Travel
join the kimchimari family
Receive Free Cookbook and New Recipes by Email
join now
  • Back to Top
  • About
  • Contact
  • Privacy
© 2023 Site Credits Designed by Melissa Rose Design Developed by Once Coupled

free recipe ebook!

Join to get my FREE cookbook + monthly newsletters + recipe updates!

Thank you for subscribing!

You will receive an email shortly.

  • 220