Milk Bread is a wonderfully light, moist and pillowy soft white bread that you will see in many Asian/Korean style bakeries or in Korean coffee shops – served in thick slices usually with jam and butter. Flavors of milk and butter with a subtle sweetness makes this bread addictingly delicious and now you can make it at home!
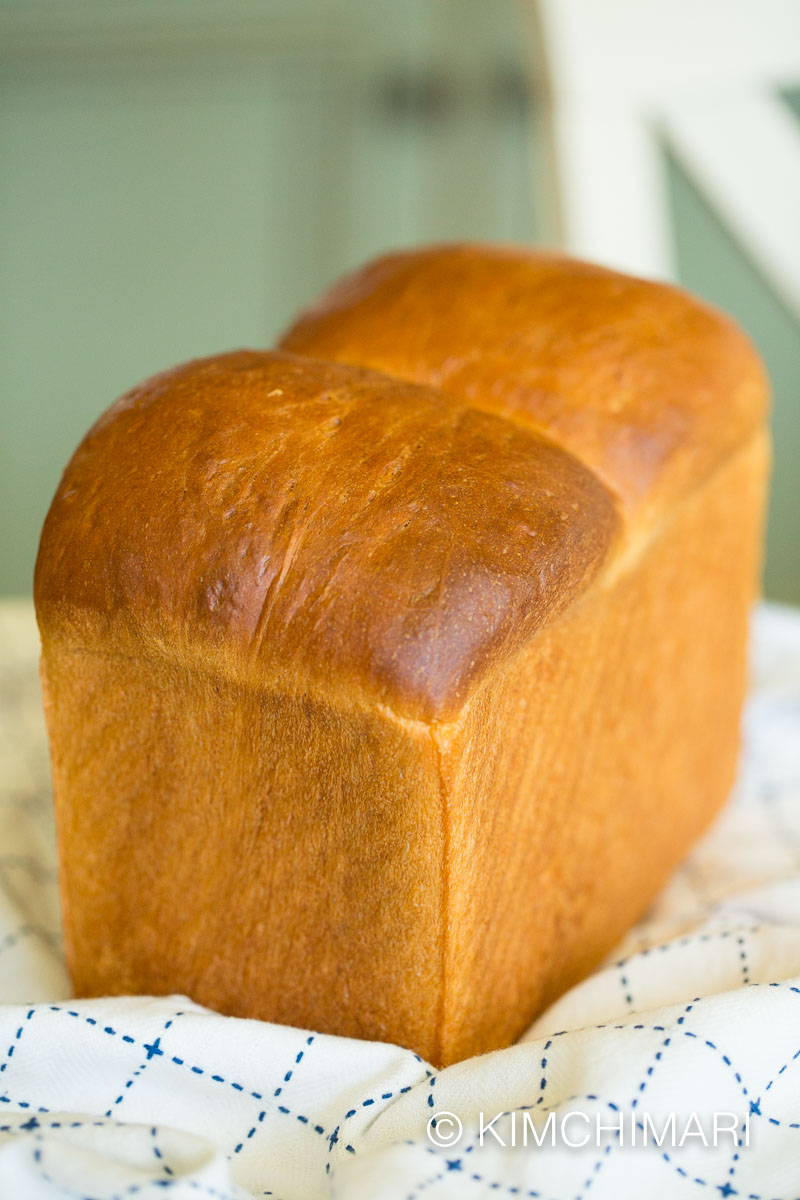
Milk Bread or Uyu Sikppang (우유식빵) is a bread that’s very popular not just in Korea but in many Asian countries including Japan (where it also goes by Shokupan), China and Taiwan. And these days you can find them in bakeries like Paris Baguette (which is a franchise from Korea) in various locations throughout the US. It is also called Asian Milk Bread, Japanese/Chinese Milk Bread (Shokupan) and Hokkaido Milk Bread.
OK, so this bread makes me think of my mom.. she loved this soft bread so much. But the way she ate the bread was pretty funny and I know she always thought she was being a bit naughty 😈when she did this. She would rip out the center of the bread, leaving a big hole behind. 😲🤭 As far as I can remember she always tried to be proper but soft milk bread was one thing that made her bad…with her eating only the center part! hahaha..
And you know.. how when growing up… our parents always told us that we should be eating every part of the bread including the crust because of whatever reason?? HAHAHA.. one reason being, we should not waste food!! When there are kids starving in faraway countries and here you are being a picky eater about the crust…
And that only spoiled kids ask for sandwiches made with bread with the crust cut out?? HAHAHA 🤣😆
Well… that was one thing my mom could never tell us because she violated this rule all the time!!
So when I made this bread and it came out just as yummy, soft and pillowy soft as how I remember it many many years ago, I was so tempted to just dig out the center and eat it – just like how my mom did… 😂🤣😂
What is special about this Milk Bread?
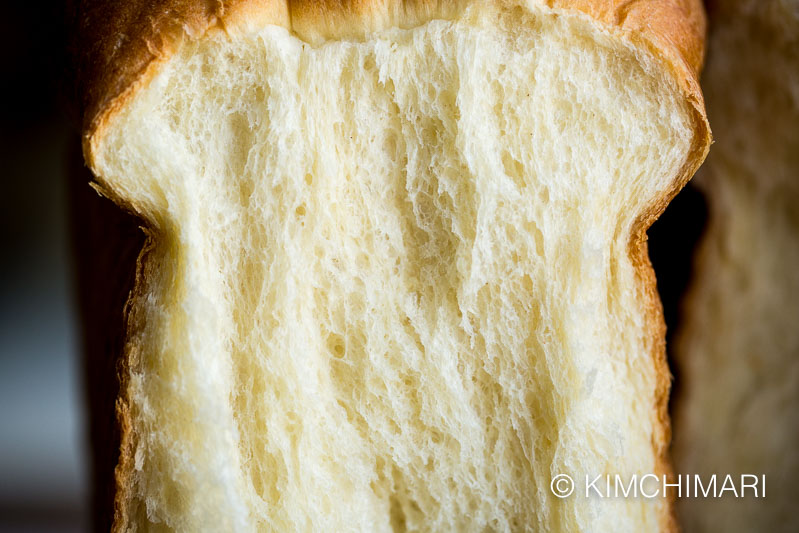
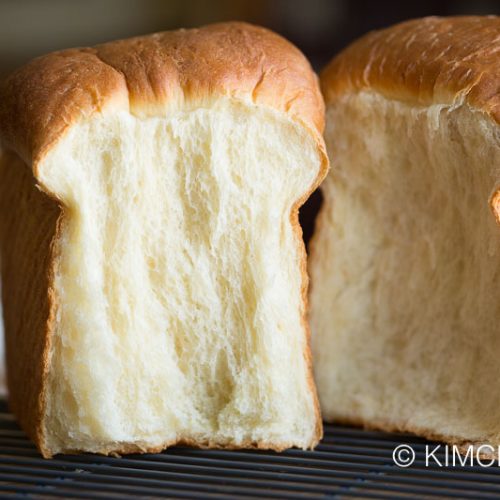
Different from the common American sandwich bread, this milk bread is made very differently and is very moist and also has a light, fluffy and slightly chewy texture. It does not ‘crumble’ like most American style sandwich bread. BTW, this bread is what Panko bread crumbs are made of.
This bread comes out so different because of a special water roux technique called Tangzhong Method (탕종법 湯種法). Flour, water and milk are mixed and heated to make a roux like mixture and this is added to the dough. This method was traditionally used in China to make buns with a soft and springy texture. And then in the early 1920’s a Japanese baker decided to use this method to make this style of soft bread.
And while the rest of Asia was widely introduced to this method by a Chinese cookbook author Yvonne Chen in a book called the “65°C Bread Doctor” in 2007, Koreans were introduced much earlier. I definitely remember eating this kind of fluffy soft bread in Korea when I was a little kid in the 70’s.
Back to Tangzhong.. this method gelatinizes the starches in the flour, allowing it to absorb and hold more water. In addition, the gelatinized starch in Tanzhong creates a more stable structure – allowing the bread to rise HIGHER (due to extra internal steam during baking) even with the extra liquid. And resultingly, the bread will come out more moist and will stay soft and fresh longer.
So one could say this is a Japanese milk bread aka Shokupan (as sadly that’s how people search) but as I mentioned above, the original method comes from China. So I want to say this is an Asian style bread more than anything. And, if you have been to an Asian bakery, you will know that each country has its own unique style of baking e.g. Taiwanese like to use Taro in their bread whereas Koreans never do.
MILK BREAD REcipe for bread machine with no Tangzhong
If you want a milk bread recipe for bread machine, you can try THIS RECIPE. I developed and tested it several times and have received great feedback from readers. This recipe also uses NO TANGZHONG but still makes just as delicious, moist and slightly chewy bread.
Different Korean Milk Breads
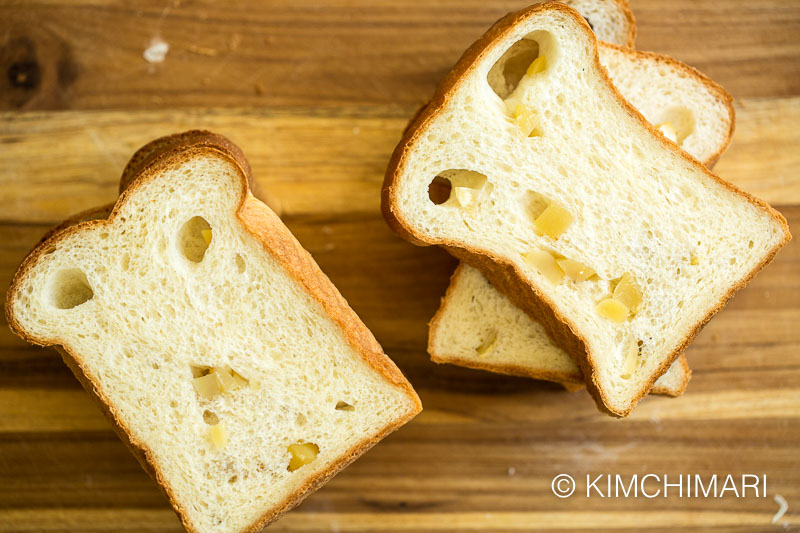
Over time, Koreans have developed their own style of milk breads – such as the Chestnut Bread (밤식빵), Corn Bread (옥수수식빵), Raisin Bread (건포도식빵), Walnut Bread (호두식빵 not to be confused with the American sweet walnut bread) and more recently, Squid Ink Bread (먹물식빵). I already made some simple chestnut bread and my husband gobbled it up right away saying it is his favorite bread growing up!
Chef’s Tips for Perfect Milk Bread
In order to bring you the best milk bread recipe, I tested a few recipes that are out there on both the Korean and American Internet. I’ve seen some recipes that do NOT use the Tangzhong method but claimed you get similar soft and fluffy results – you cannot. I’ve seen some Korean milk bread recipes that talk about adding the sugar, yeast and salt but not letting them touch each other until they are mixed. Not sure who came up with that bright idea but I tried a few and didn’t matter at all and actually failed each time without Tangzhong.
I’ve looked at the top four US recipes and tried a couple but was not happy with the result. It just didn’t rise as much as I wanted it to. I think part of the problem with these recipes was that it doesn’t have pictures or details for me to know how much to knead, etc. There was only 1 recipe that came out like how I wanted it (by NYT Cooking) and my recipe is based on that mostly but with some changes (low-fat milk instead of whole milk, reduced sugar, a little more flour) to it.
- Follow instructions carefully – baking is a science so every little detail can make a big difference. Measure in weight too.
- Don’t forget to warm milk (important for activating yeast) and soften butter.
- Use Bread flour. It’s different from regular All Purpose flour.
- Use Fast Acting Instant Yeast and make sure it’s not expired.
- Time for mixing dough and proofing is an estimate, it can vary depending on the temperature and humidity. Learn to adjust by checking the dough.
- Store leftover Tangzhong in the fridge – if you happen to make extra. The recipe below will make enough for 1 bread. When using leftover starter, just reheat to room temp before using.
- Use a narrower bread loaf pan or pullman loaf pan (without the top) for best results.
- Variations – in addition to adding raisins or canned chestnuts, you can also add cinnamon sugar, chocolate or fruit jam when rolling to make different flavored breads.
- Storage – bread will keep fresh for 3 days, wrapped in foil or frozen up to 3 months
Can I substitute non-instant Active yeast? What do I need to do differently?
With the latest shortage in yeast, I know many of you may only be able to get the non-instant Active Yeast (you are lucky if you can even get that!). In that case, you can use it but the non-instant kind have to be activated first in warm liquid. In the recipe below, in step 4, after warming up the milk, add the yeast to warm milk and let it activate.
Once yeast has activated (bubbles up) in the milk in about 5 minutes or so, you can add the milk to the dough. Also, you may want to increase the proving time by 10-15 minutes when using non-instant Active Yeast since they take longer.
Step-by-Step Directions
Makes 1 loaf
Total Cooking Time: 4 1/2 hours Inactive Cooking Time: 3 hrs Difficulty: Medium
Equipment: Stand mixer with a dough hook (can be needed by hand), whisk, small pot, 2 bowls, loaf pan (9″x 5″ or narrower), rolling pin ** I used Monfish Pullman loaf pan (8.35 x 4 inch) – buy it here.
- Bring egg and butter to room temperature or soften butter in the microwave (like 30 sec at 30% power for 4 Tbs).
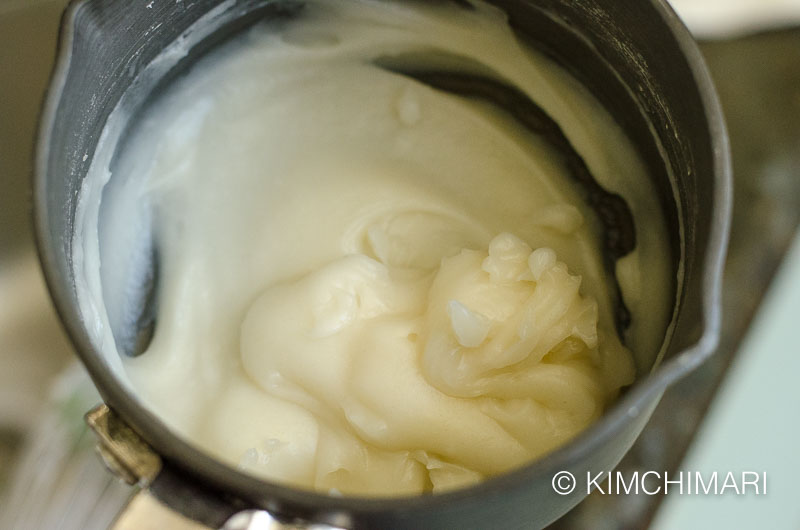
- Starter : In a small sauce pot, add flour, milk, water and whisk. Turn heat to medium and cook for 2-3 minutes for this minimum amount (longer if you are making more than 1 loaf). For the first 1-2 minutes, check every 10-15 seconds and whisk. After 2 minutes, as it starts to thicken, whisk constantly until everything is cooked and thickened. When it is done, whisking should leave tracks on the bottom of the pot and hold its shape like below.
Tangzhong Dough starter cooked in pot - Dough: In a stand mixer bowl (using a dough hook), add flour, sugar, yeast, salt. Mix the dry ingredients with the dough hook for a few seconds until they are evenly combined. When done, I also like to use my hands to mix again just to make sure things are evenly mixed including the bottom of the bowl.
- Warm up milk in a pot or in the microwave – until it feels like very warm bath water (110° F/43° C).
- To mixer bowl with dry ingredients, add warm milk, all of the starter made in step 2 and egg. Turn the mixer on low speed and knead for 5 minutes.
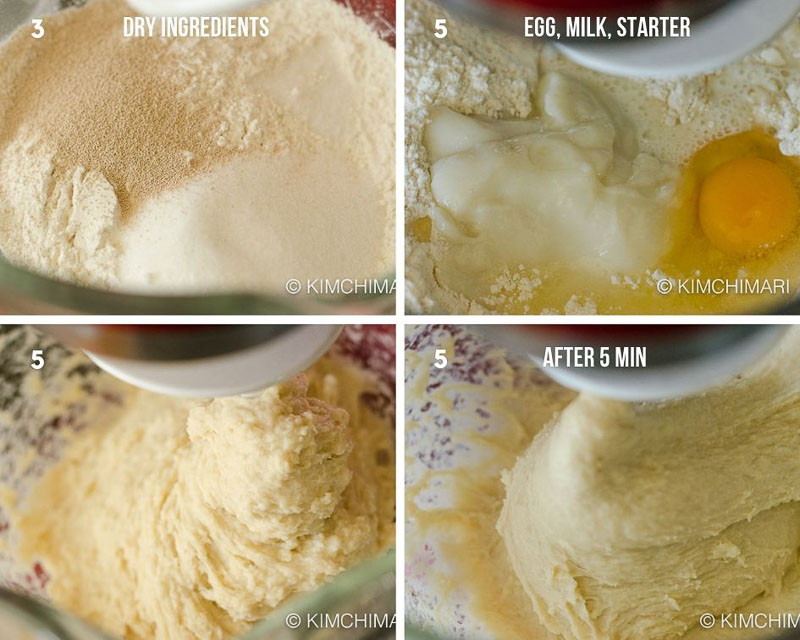
How to mix milk bread dough in stand mixer - Butter your loaf pan and butter two bowls where the dough will be proved. One should be large enough to hold more than double size of the dough.
- Add softened butter to the dough from 5 and knead for 10 – 11 minutes. First at medium-low speed for a couple minutes until the butter is all incorporated (it doesn’t seem like it will get mixed in but keep kneading and eventually the butter will disappear into the dough) then at medium speed until dough becomes smooth and stretchy but a little tacky. Dough will stick to the sides of the bowl till the end and that’s how it should be. See video.
- Transfer the dough with your hands to the buttered bowl from 6. See how smooth it looks in the mixing bowl but also how sticky it is – sticking to the side of the bowl.
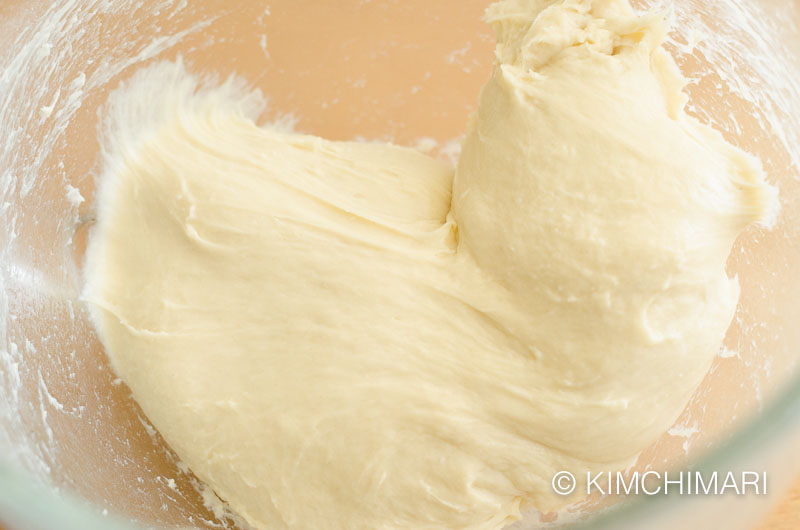
finished milk bread dough before it is shaped Shape it a bit with your hands to make it into a ball. Cover with a plastic wrap or with a kitchen towel and let it rise in a warm location for 40 t0 60 minutes or until it has doubled in size. To ensure consistent results, I used my oven’s PROOF function which sets the oven at 100°F. In this setting, the dough will only need to prove for 40 minutes.
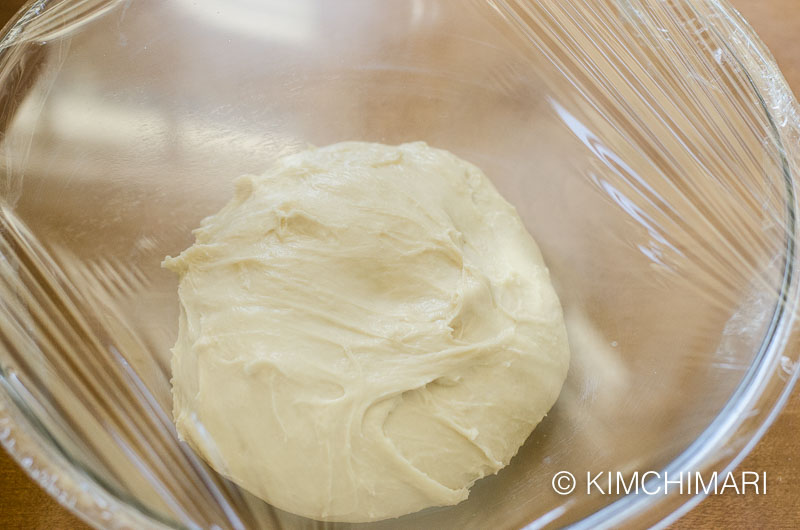
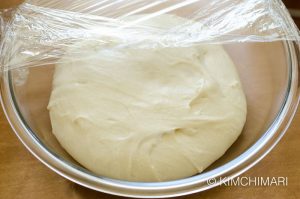
Dough ready for 1st proof 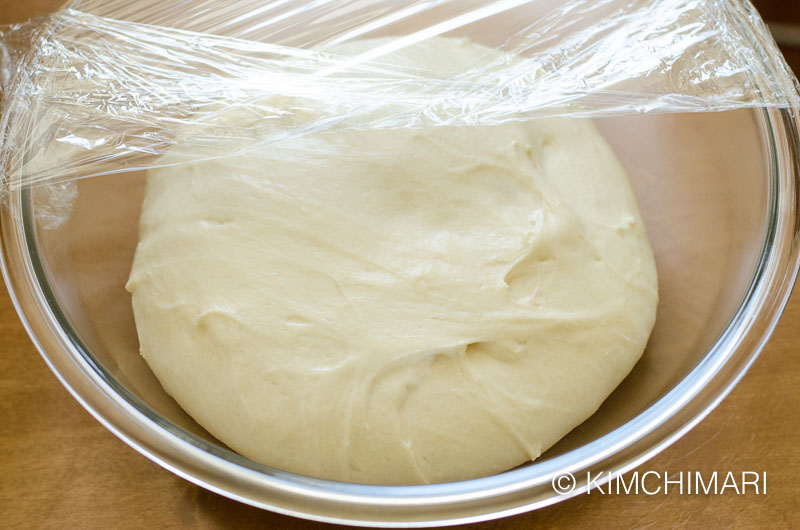
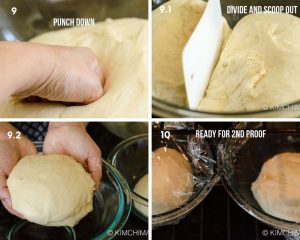
Dough after 1st prove of 40 minutes (it is now double the size) - Uncover the dough and punch it down with your fist. Pull the sides away from the dough and form it into one large ball then using a dough scraper. Then divide the dough in two and scoop out half of the dough into your hand. With your hands, form the dough lightly into a ball and then put it into the 2nd bowl. Scoop out the remaining dough and form it into a ball again with the seam side down and put it back in the bowl.
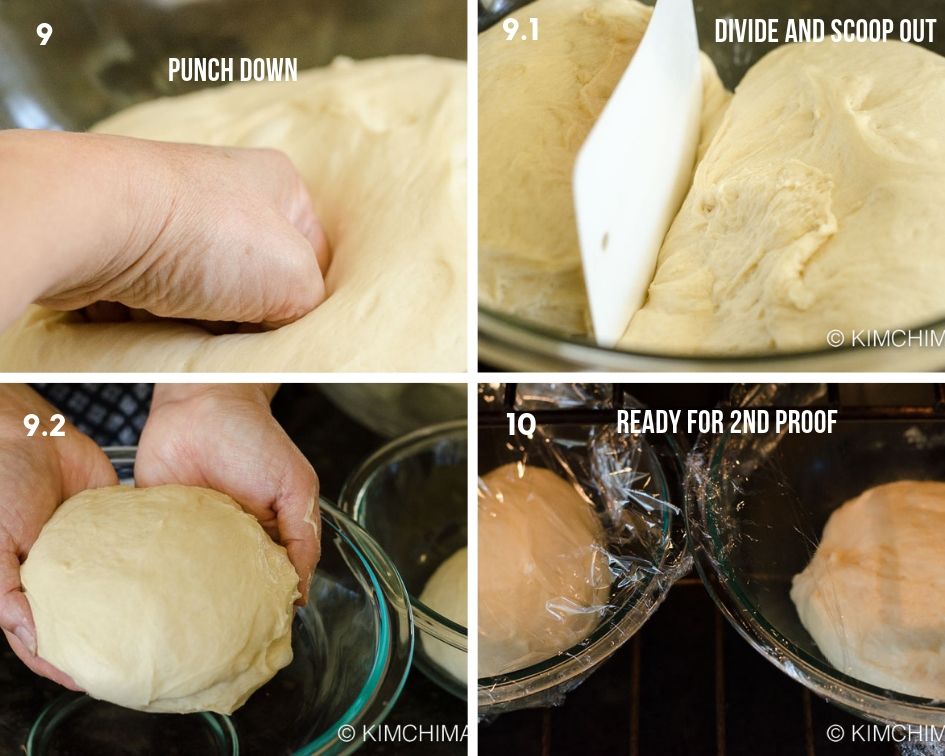
Prepping and dividing dough for 2nd proof - Cover both bowls with dough with a plastic wrap or kitchen towel and let it rise again (in a warm location) for 15 – 17 minutes. Again, I used my PROOFing function in my oven.
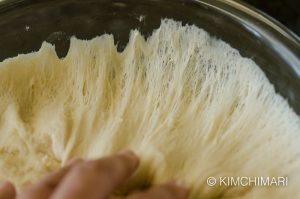
- Once dough has risen, pull the dough away from the side of the bowl and transfer one dough on a smooth surface (granite or marble works well). This is how properly proofed dough will look when you pull it from the sides.
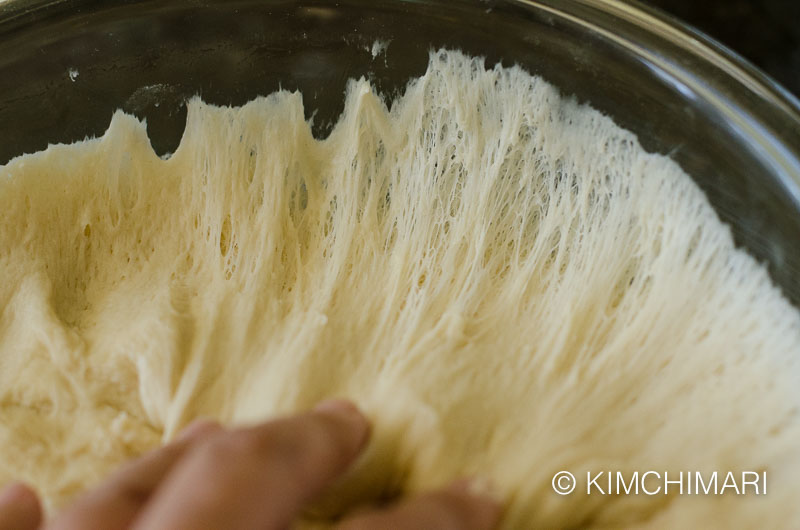
Pulling proofed dough away from the side of the bowl Sprinkle surface very lightly with flour and also the rolling pin. You don’t have to sprinkle flour on the surface but it makes things easier.
- Roll out one dough ball into a thick rectangle (or oval) about 12 inches long and 4-5 inches wide.
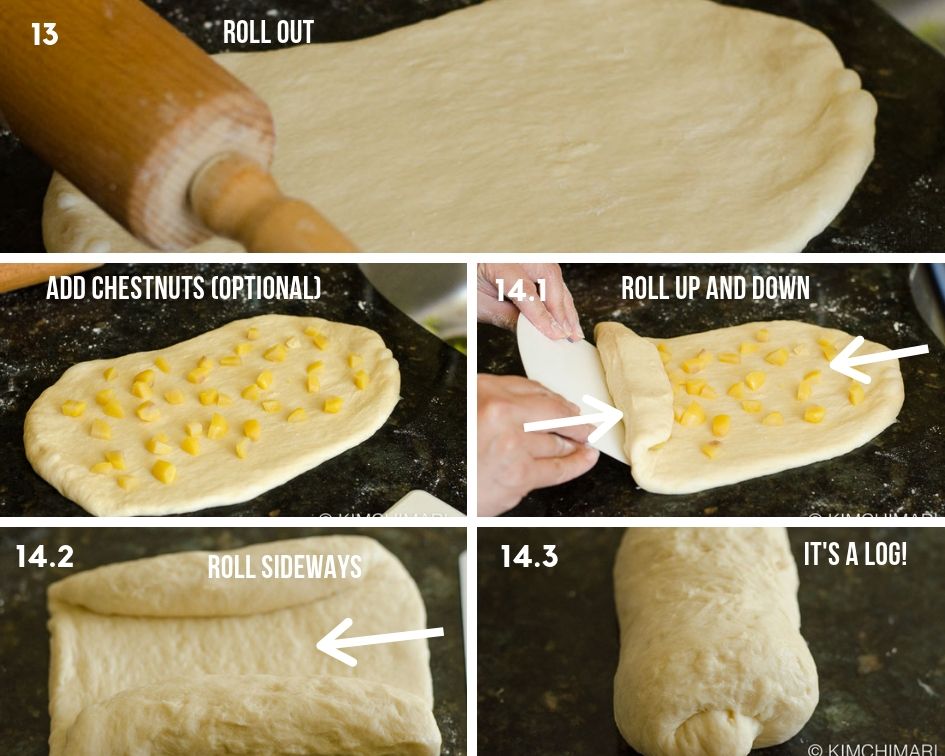
How to Roll Milk bread dough into a log - Fold or roll the top of the dough (like 3 inches) down and then fold the bottom up about the same amount, resulting in a square-like dough shape. Then roll it into a log, starting from the right edge of the square. Pick up the log and nestle it down near one end of the loaf pan. REPEAT with the other dough ball and place it at the other end of the loaf pan. TIP – as you are folding/rolling the dough off the surface, you may find that it sticks too much. Use a dough scraper to get the dough off from the surface instead of just trying to use your hands.
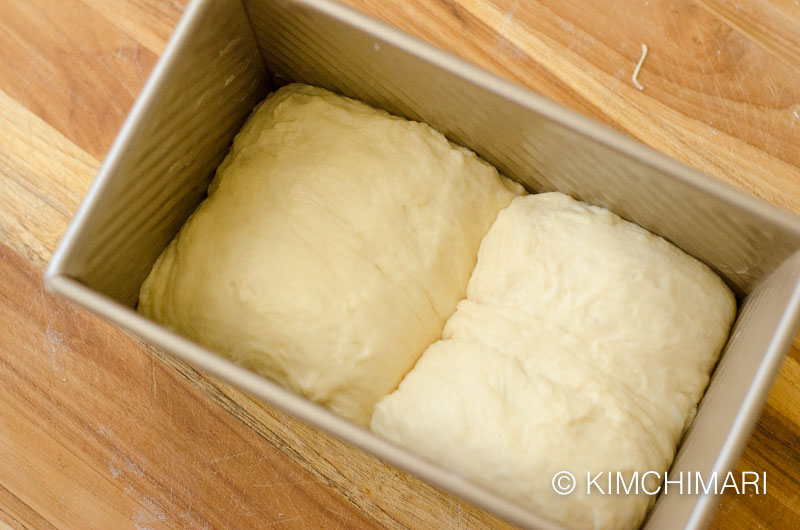
Bread dough in Loaf Pan - Cover the loaf pan and let it rise again for 30 to 40 minutes – this time I usually let it rise at room temp while I wait for the oven to heat up. But you if your room temp is cold, you are welcome to use the PROOF function in your oven again and let it rise first. In which case, I would take it out a bit sooner so it doesn’t over-prove.
- Start heating oven to 350°F/175° C, choose Convection Bake if you can.
- After 30 min, the dough is now visible above the edge of the pan and the 2 dough logs have fully filled up the pan.
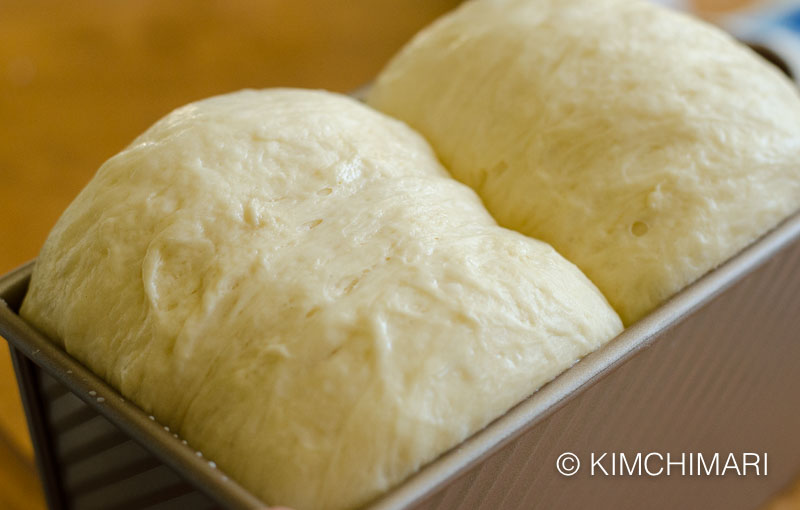
Milk Bread all proved and ready for oven Optionally, brush the tops lightly with milk (for shine) and bake on the bottom shelf of the oven (you probably will need to take out a shelf since this bread will rise quite a bit during baking) until golden brown about 32-35 minutes. Bake a little longer if you pierce it with a long skewer or thin metal chopstick (in the lowest part) and it doesn’t come out clean or take it out sooner if your oven is a powerful convection oven and it comes out clean.
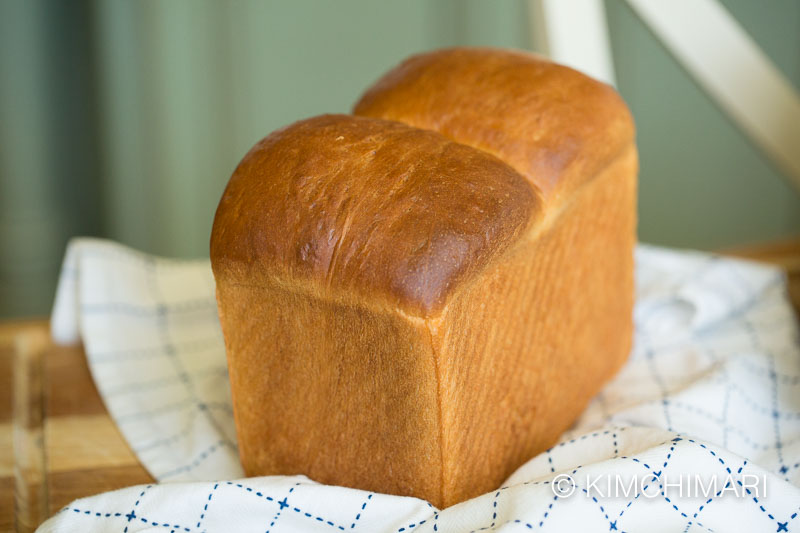
Whole Milk Bread (Korean/Japanese/Asian style) - Let the milk bread cool in the pan for 10-15 minutes and then take the bread out of the pan onto a wire rack and let it cool for at least an hour or more before slicing because if you slice too soon when it’s still warm, the bread may collapse! TIP – if you want a very soft crust, loosely cover the bread with foil or wrap while it cools.
Notes
- General Tangzhong starter recipes refer to a pourable consistency with 1 part dry to 5 part liquid (1:5 ratio in volume) while some other recipes use 1 part dry to 3 part liquid ratio. My recipe has a 1 to 3.2 ratio (in volume) which makes it thicker but it works!! *2.5 Tbs flour : 8 Tbs total liquid = 1 : 3.2 ratio.
- Use the same dough but divide into smaller dough balls and make pull-apart round rolls. Follow this Milk Bread Rolls recipe.
- To make Korean chestnut bread (bamsikppang), use Korean canned chestnuts that come in syrup. Drain and cut into smaller pieces.
Well, it’s time for some toast and tea!!
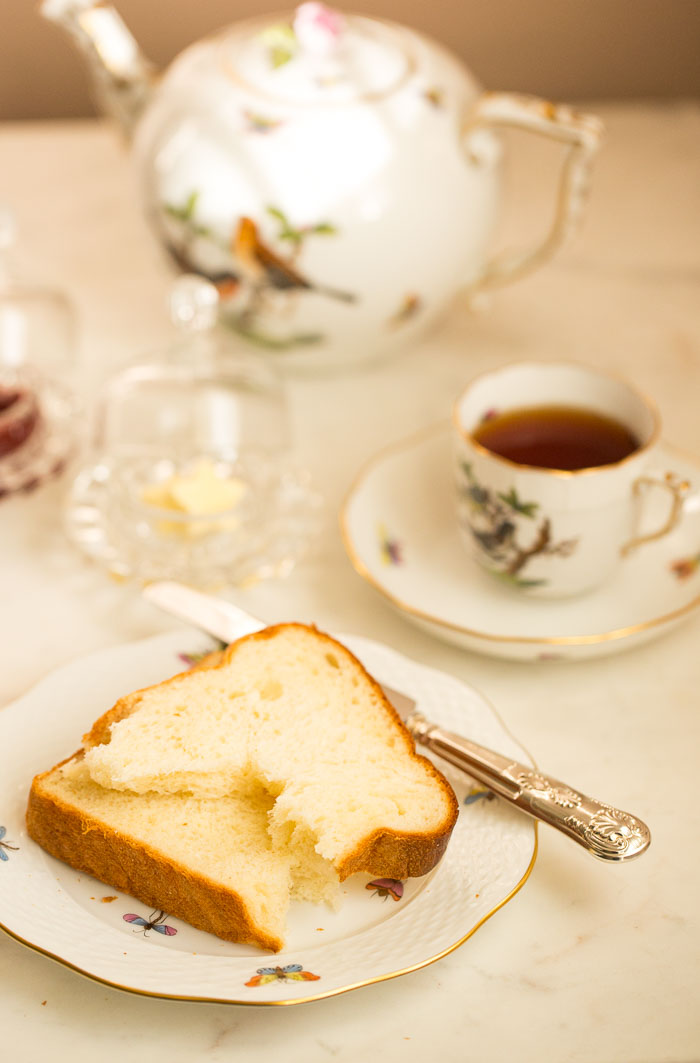
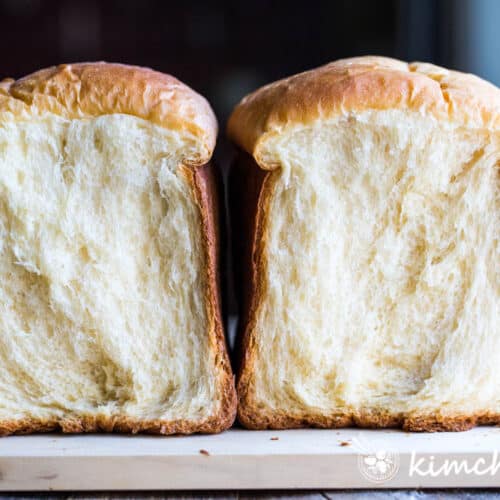
And here’s one final look at how the bread looks when torn up or when it’s sliced. 😍
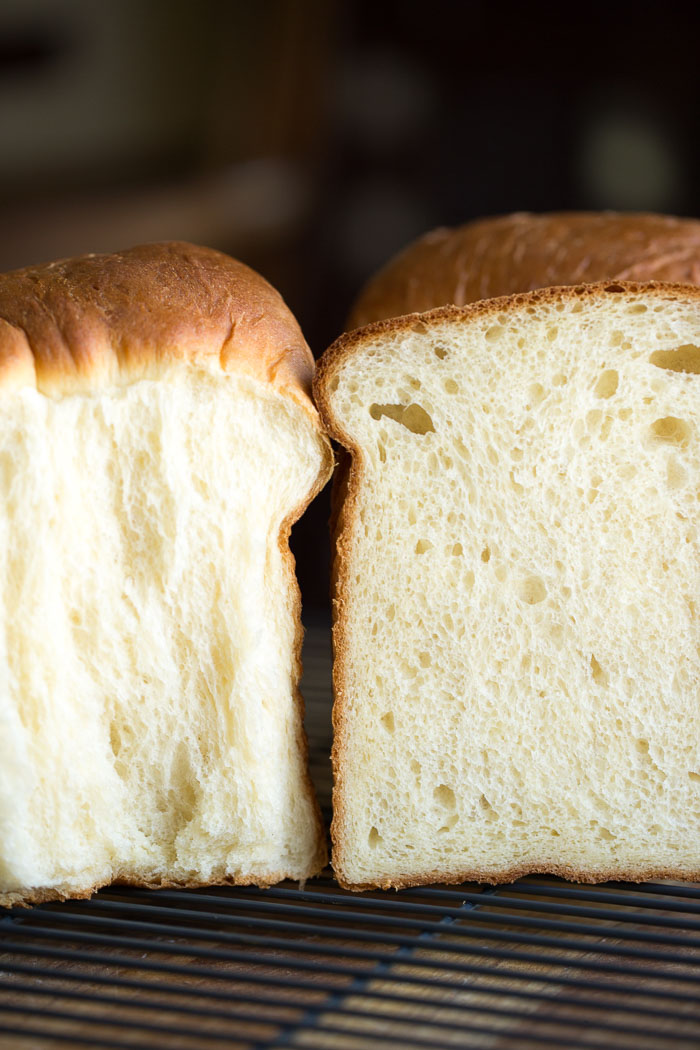
Enjoy! ❤️
JinJoo
How to make Milk Bread Video
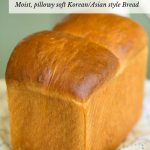
Milk Bread (우유식빵 Uyu Sikppang) aka Japanese Milk Bread that's just as good as ones from the bakery!
Milk Bread (Soft and Fluffy Asian Style)
Ingredients
Starter
- 22 g unbleached bread flour (22g = 2.5 Tbsp)
- ¼ cup water
- ¼ cup 2% low fat milk (can also use whole milk)
Dough
- 330 g unbleached bread flour (330g = 2 ½ cups)
- 7 g instant yeast (7g = 1 packet = 2 tsp)
- 1 tsp salt
- 50 g sugar (50g = 3.5 Tbsp)
- ½ cup 2% low fat milk (warmed, plus a little extra for top of loaf)
- 1 egg
- 60 g unsalted butter (room temp, cut into small pieces 60g = 4 Tbsp)
- 1 Tbsp unsalted butter (for bowls and pan)
Instructions
- Bring egg and butter to room temperature or soften 60 g unsalted butter in the microwave (like 30 sec at 30% power for 4 Tbs).
Make Starter
- In a small sauce pot, add 22 g unbleached bread flour, ¼ cup 2% low fat milk, ¼ cup water and whisk. Turn heat to medium and cook for 2-3 minutes for this minimum amount (longer if you are making more than 1 loaf). For the first 1-2 minutes, check every 10-15 seconds and whisk. After 2 minutes, as it starts to thicken, whisk constantly until everything is cooked and thickened. When it is done, whisking should leave tracks on the bottom of the pot and hold its shape like below.
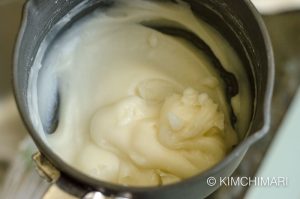
Make Dough
- In a stand mixer bowl (using a dough hook), add 330 g unbleached bread flour 50 g sugar, 7 g instant yeast, 1 tsp salt. Mix the dry ingredients with the dough hook for a few seconds until they are evenly combined. When done, I also like to use my hands to mix again just to make sure things are evenly mixed including the bottom of the bowl.
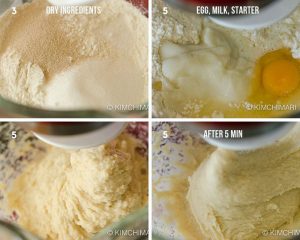
- Warm up ½ cup 2% low fat milk in a pot or in the microwave - until it feels like very warm bath water (110° F/43° C).
- To mixer bowl with dry ingredients, add warm milk, starter and 1 egg. Turn the mixer on low speed and knead for 5 minutes.
- Use 1 Tbsp unsalted butter to butter your loaf pan and butter two bowls where the dough will be proved. One should be large enough to hold more than double size of the dough.
- Add softened 60 g unsalted butter to the dough from 5 and knead for 10 - 11 minutes. First at medium-low speed for a couple of minutes and then at medium speed until dough becomes smooth and stretchy but a little tacky. See video.
Prove Dough
- Transfer the dough with your hands to the buttered bowl from 6. See how smooth it looks in the mixing bowl but also how sticky it is - sticking to the side of the bowl.
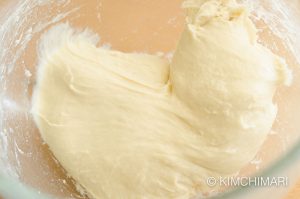
- Shape it a bit with your hands to make it into a ball. Cover with a plastic wrap or with a kitchen towel and let it rise in a warm location for 40 to 60 minutes or until it has doubled in size. Here's before -
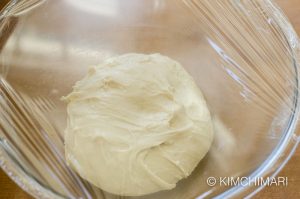
- And after it has proved
- Uncover the dough and punch it down with your fist. Divide dough in two and scoop out half of the dough. Form the dough lightly into a ball and then put it into the 2nd bowl. Scoop out the remaining dough and form it into a ball again with the seam side down and put it back in the bowl.
- Cover both bowls with dough with a plastic wrap or kitchen towel and let it rise again (in a warm location) for 15 - 17 minutes.
- Once dough has risen, transfer one dough on a smooth surface (granite or marble works well), sprinkle surface very lightly with flour and also the rolling pin. This is how it looks when properly proved and pulled from the sides.
- Roll out one dough ball into a thick rectangle (or oval) about 12 inches long and 4-5 inches wide.
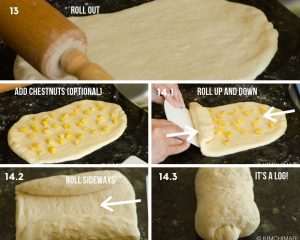
- Fold or roll the top of the dough (like 3 inches) down and then fold the bottom up about the same amount, resulting in a square-like dough shape. Then roll it into a log, starting from the right edge of the square. Pick up the log and nestle it down near one end of the loaf pan. REPEAT with the other dough ball and place it at the other end of the loaf pan.
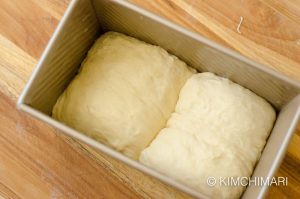
- Cover the loaf pan and let it rise again for 30 to 40 minutes until the dough is visible above the edge of the pan and the 2 dough logs have fully filled up the pan.
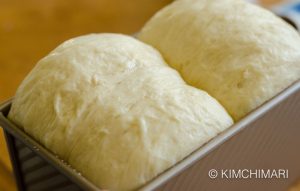
- Heat oven to 350°F/175° C.
Bake - at 350°F/175° C.
- Optionally, brush the tops lightly with milk (for shine) and bake on the bottom shelf of the oven (you probably will need to take out a shelf since this bread will rise quite a bit during baking) until golden brown about 32-35 minutes. Bake a little longer if you pierce it with a toothpick (in the lowest part) and it doesn't come out clean.
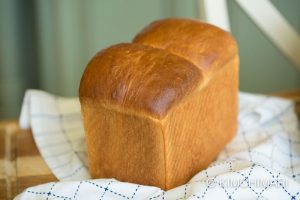
- Let the milk bread cool in the pan for 10-15 minutes and then take the bread out of the pan onto a wire rack and let it cool for at least an hour or more before slicing because if you slice too soon when it's still warm, the bread may collapse!
Equipment
- stand mixer
- small pot
- 2 mixing bowls
- 9 x 5 loaf pan
- whisk
Tips & Notes:
- With the latest shortage in yeast, I know many of you may only be able to get the non-instant Active Yeast (you are lucky if you can even get that!). In that case, you can use it but the non-instant kind have to be activated first in warm liquid. In the recipe below, in step 4, after warming up the milk, add the yeast to warm milk and let it activate. Once yeast has activated (bubbles up) in the milk in about 5 minutes or so, you can add the milk to the dough. Also, you may want to increase the proving time by 10-15 minutes when using non-instant Active Yeast since they take longer.
- Some recipes will say Tangzhong starter should have pourable consistency with 1 to 5 dry to liquid ratio and I have tried those but it really doesn't work as well. This recipe has a 1 to 3.2 ratio which makes it thicker but it works!!
- Use the same dough but divide into smaller dough balls and make pull-apart round rolls.
- If you want a very soft crust, loosely cover the bread with foil or wrap while it cools.





Used this dough to make cinnamon rolls and they turned out perfect!
Ooh awesome!! I haven’t done it myself – now I want to try it! Thank you so much!
Made this three times now and each time it has turned out to be incredibly soft and delicious. Absolutely perfect for kaya toast, or just to munch on it’s own.
This is the lightest, airy, softest, fluffiest most wonderful bread recipe I ever had! My boys and I killed half in 5 mins after it was cooled enough. Thank you so very much!!!!
Aww.. I’m soo glad to hear that!! I know milk bread IS really the fluffiest and lightest and delicious bread! Thank you so much for taking the time to comment, I so appreciate that.
Hi, this looks like a great recipe! I’d be very interested to try it out – however, I have two family members who are allergic to wheat. Do you know if there is a way to make a gluten-free version of this bread? If there isn’t, that’s okay. Thank you 😊
Hi Rachel, I’m so sorry but I don’t yet have a gluten-free recipe for milk bread. Thank you for asking!
I love this recipe
Yay! thank you so much!