The last time I took part in Kimjang (Korean tradition for making a lot of Kimchi to last through the winter months) was when I was still living at home in Seoul. Our family was quite large back then and we lived in a home where our back yard actually had buried kimchi jars. If my memory serves me right, I think we pickled 100~200 cabbages each winter which meant it was really a several day event – couple days to wash and salt the cabbages + prepare the yangnyum and other ingredients, another couple days to rinse and stuff the cabbages.
Many people will say Kimjang is hard work but for me it was a very fun and exciting time. Fun because family and friends got together, worked all day long (even sometimes outside in the cold) but also shared some good food and good times with each other. I remember a particular joke adults played on each other – wrapping up a big piece of ginger inside a piece of freshly made cabbage kimchi and offering it to another to taste. Yikes!!!
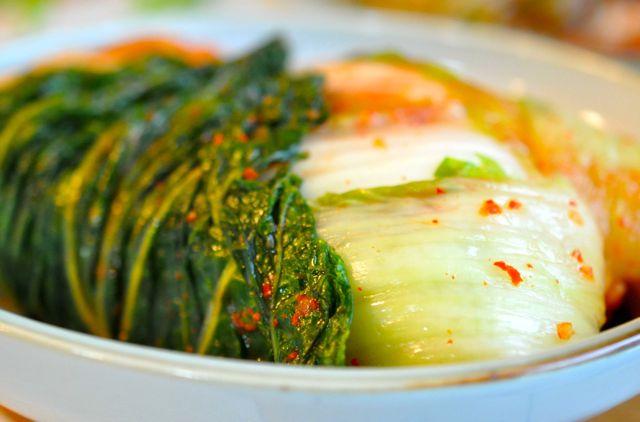
My family usually made at least 3-4 kinds of kimchi: the original stuffed whole cabbage(배추김치 baechoo kimchi), radish kimchi in water (동치미 dongchimi – this is a North Korean favorite), kimchi wrapped in cabbage parcels (보쌈김치 bossam kimchi) and young radish kimchi (총각김치 chonggak kimchi aka ‘bachelor’ kimchi). This year, my mother-in-law made white cabbage kimchi (백김치 white kimchi), two kinds of traditional cabbage kimchi (one with fermented anchovies and another with fermented shrimps).
Please note: This Part 1 post is a rough overview of what happened during Kimjang Day. Part 2 will contain a more detailed discussion of ingredients and tips on how to make a great tasting kimchi.
Time: 2 days Servings: 10-12 servings Difficulty: difficult
Ingredients for traditional cabbage Kimjang Kimchi
* these measurements are approximate and should be adjusted to taste
- 2 Korean Napa cabbage (배추 baechoo)
- 1 large Korean radish (무우 moo)
- 3~4 C sea salt with bittern removed
- 20 C water (for brine)
- 1 C ~ 1 1/2 C Korean chili powder (adjust to taste – even up to 2 C)
- 1/2 C chopped garlic
- 1 T chopped ginger
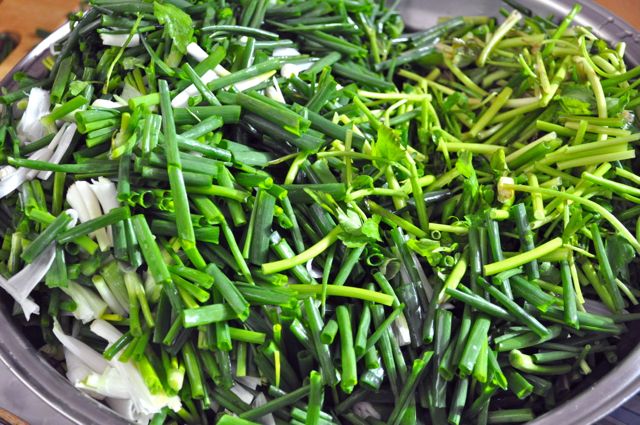
- 8 green onions, sliced thin 1 1/2 in long
- 7 oz water parsely/water dropwort (미나리 minari), cut 1 1/2 in long
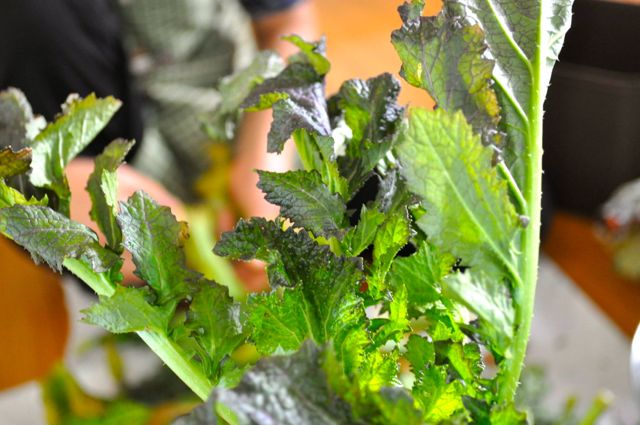
- 1 bunch Korean mustard greens (갓 Gaat)
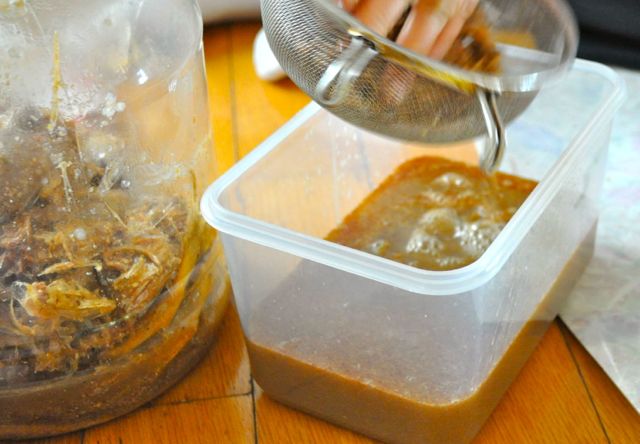
- 1/2 C total fermented seafood sauce (one or more of the following)
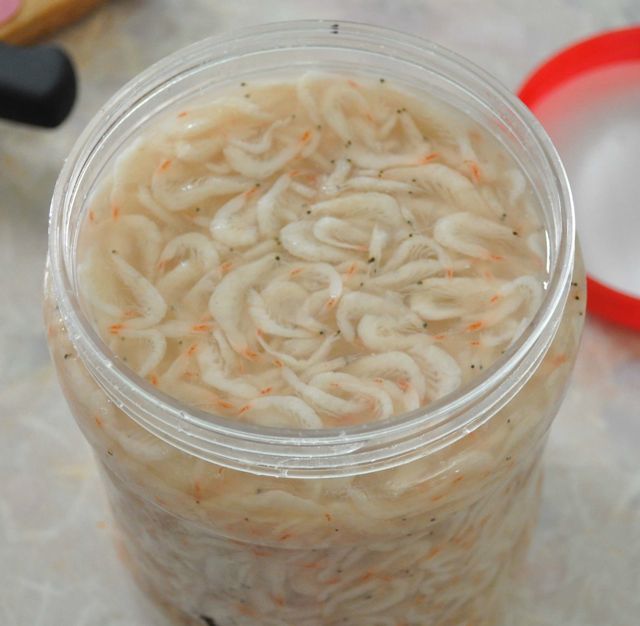
- fermented anchovies (멸치젓 myulchijeot)
- fermented shrimps (새우젓 saewoojeot)
- fermented yellow croaker (조기젓 jokijeot)
- fermented sand lance (까나리젓 kkanarijeot)
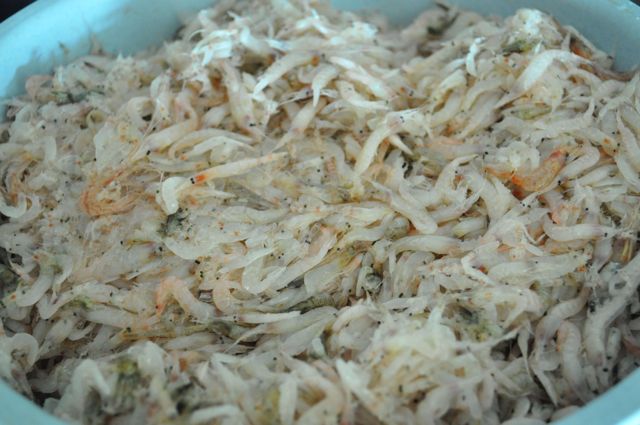
- 1/3 C chopped fresh shrimp or fresh oysters (optional)
- OPTIONAL (really, this is extra)
- Korean or Asian pear
- persimmon (the hard kind)
Directions
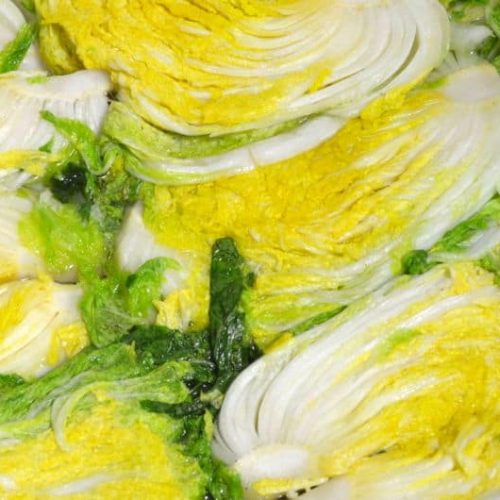
- Prepare cabbages: First, set aside about 1/2 C of the sea salt to sprinkle directly in between cabbage leaves. Dissolve remaining sea salt with 20 C water to make brine. Cut cabbages into 2-4 pieces and soak in brine for 30 minutes. Drain (save the brine) and then sprinkle salt between leaves focusing on the thicker, white fleshy part. Soak the cabbages overnight or 8-10 hrs in the brine again. Turning 1-2 times to evenly pickle the cabbage. When properly salted, the cabbages should look something like this..
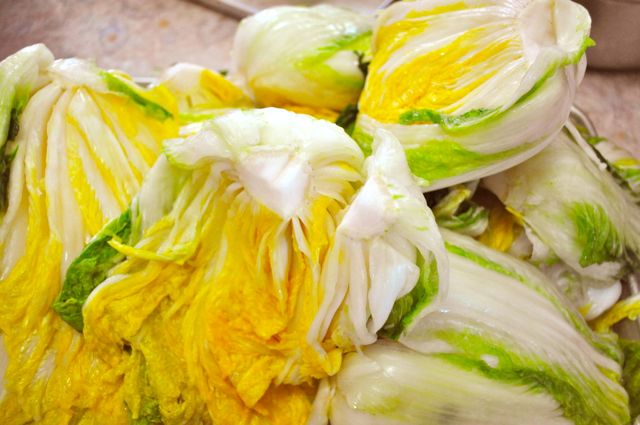
salted cabbages rinsed for kimchi Rinse the salted cabbages in water 2-3 times and let it drain fully (1 hr or so).
** Salting cabbages correctly is pretty tricky and some people say it’s actually the most difficult part of making kimchi. So these days, many cabbage farms sell already salted cabbages which makes the whole process so much easier.
- Prepare yangnyum :
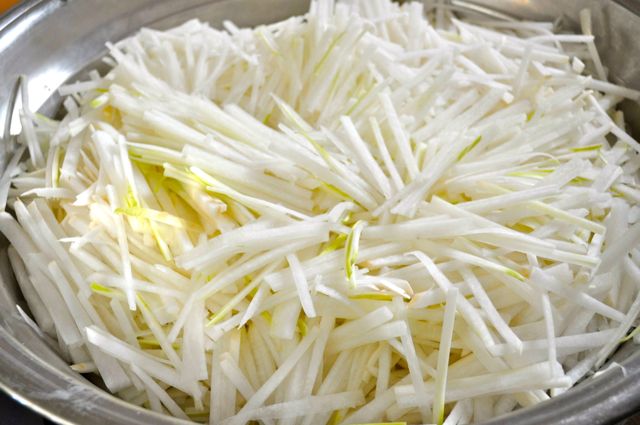

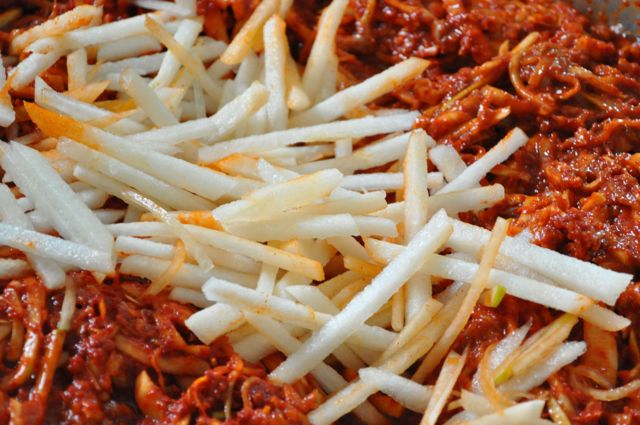
Mix the radish with chili powder until radish pieces are completely coated.
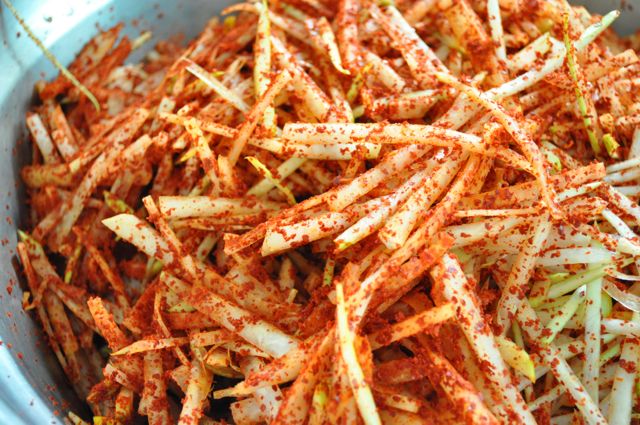
Wash and cut green onions, dropwort and mustard leaves. In volume it’s about equal amount to radish.
Mix the greens into the yangnyum. Also add ginger and garlic.
These miniature shrimps are the same shrimp used to make fermented shrimps (새우젓 saewoojeot). Using fresh shrimp is totally optional but many like to add them because it makes Kimchi taste better – a little sweeter? If you can’t find miniature shrimps, you can just add regular minced shrimp meat and it will taste just as good.
Now add the fermented stuff. I listed several options but the basic one to use is either the anchovies or shrimps. You can add both or just one. Add the liquid from fermented anchovies (멸치젓 myulchijeot) or fermented shrimps (새우젓 saewoojeot) by pressing them through a sieve or squeeze the juice by hand. My picture of anchovies was pretty bad so I’m just posting the shrimps and yellow croaker here.
Optionally add sliced pear (thicker strips than radish since pear breaks easily) and/or persimmon to yangnyum. Just a handful of pear/persimmon will do fine. The fruits add natural sweetness to Kimchi without additional sugar.
Taste the yangnyum. It should taste saltier, spicier and more pungent than how a ripe kimchi tastes. But it should still taste pretty good overall. Add more fermented shrimp or anchovy liquid if it’s not salty enough. You can also add regular sea salt instead. The saltiness and spiciness will lessen (maybe about 20% less?) with fermentation.
3. Now it’s time to stuff the cabbage:
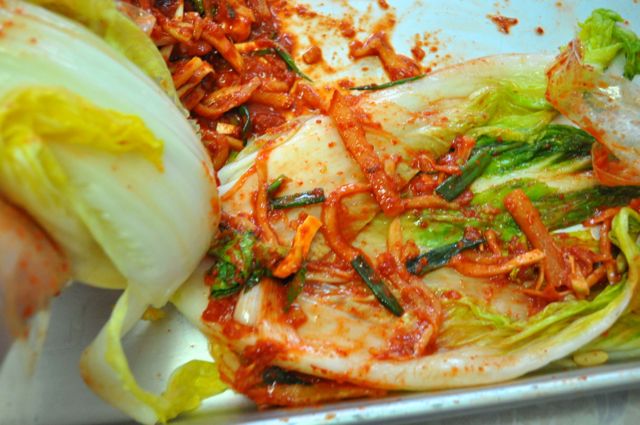
Take each cabbage halves or quarters and insert about a heaping tablespoon amount of stuffing in between each of the leaves. Start from the larger leaves and work your way up to the smaller leaves. Don’t worry about coating the whole leaf but concentrate on the thicker white parts of the cabbage.
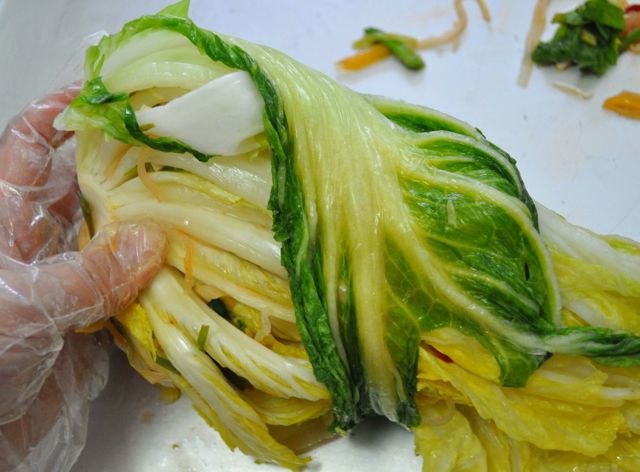
When you are done stuffing all layers, take the outermost leaf and wrap the cabbage to keep the stuffed yangnyum from falling out. In a large container big enough to hold all the cabbages, start packing in each of the stuffed cabbages as tightly as possible.
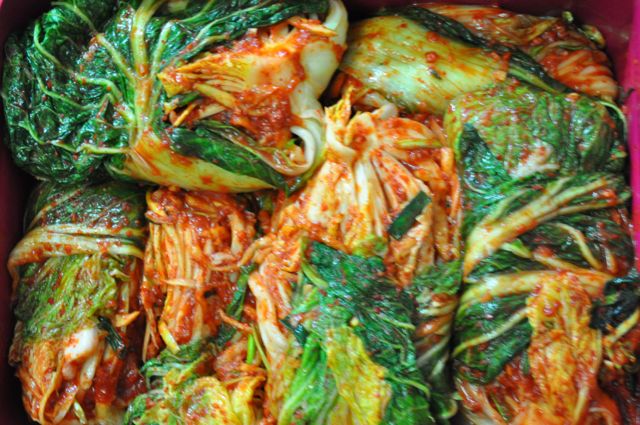
This is a large rectangular container that comes with my Kimchi fridge. But you are welcome to use one of those large pickle jars or any container that suits you. The goal is to pack the cabbages tightly so that they can ferment in their own juices as much as possible.
4. Because Kimjang Kimchi is meant to last through the winter, it should ripe slowly in the most ideal temperature. See my No Crazy Kimchi post for more detailed info on ripening kimchi.
In this year of 2012, a survey showed only 52% of Korean families plan to do their own Kimjang – down from last year’s 57%. 20 years ago, my guess would be that over 90% of Korean families did their own Kimjang. Unless you were too poor or too sick to do it, it was a must for every Korean family. With families getting smaller and young people’s taste becoming more westernized, the trend will likely continue. Which made me cherish this year’s Kimjang even more…
Check out Kimjang Part 2 for tips ingredients used in Kimjang Kimchi.


Thanks for this! I’ve been wanting to make my own Kimchi for a while now but didn’t really know where to start. This is a great help. How long does it last in the fridge after I make it?
You are welcome! Under ideal conditions (see my no crazy kimchi post for perfect temp) with all the ingredients being close to perfect (salt, cabbage, red chili powder), it can last for 1-3 years but realistically, it will last a good 2-3 months at least if you do everything right. Put in the fridge sooner than later and keep it at low temp. Read my No Crazy Kimchi post on how to ripen properly. Good luck! Let me know if you have more questions!
How long could you store them in those jars? And what if it’s summer?
Hi Dillon, I assume you mean the clay jars and when they are buried in the ground? Once buried in the ground, they do maintain a cooler and more constant temperature and can store for years under ideal temperatures and salt content. Normally, it is hard to make it last thru summer. See my No Crazy Kimchi post for more discussions on this.
This website is fantastic! I have enjoyed kimchi for a while, and I found some recipes in The Art of Fermentation and Lucky Peach. I tried the Lucky Peach recipe and it turned out okay, but a little too sweet. This recipe sounds much more promising, I look forward to trying it!
Hi! Thank you so much for finding me 🙂 Authentic Kimchi is usually not sweet. Only couple radish Kimchi and water Kimchis are sweet. BTW, if you want something a little simpler than Kimjang Kimchi recipe, you may want to try Mak Kimchi recipe at https://kimchimari.com/korean-easy-kimchi-recipe-aka-mak-kimchi/ . Also, there’s Green Cabbage Kimchi recipe too where you make Kimchi with regular green cabbage (the one you make coleslaw with). Good luck!!
I was wondering why you don’t use chap ssal garu or glutinous flour? Is there a specific reason why you don’t add this to your kimchi?
Hi! Great question! So, if you look at my other Kimjang article (https://kimchimari.com/kimjang-day-part-2-ingredients-and-tips/), I talk about reasons for using chap ssal garu/glutinous flour and also my reason for not using it in that Kimjang recipe. Basically the sweet rice, glutinous flour is NOT a mandatory ingredient but people use it because it helps kimchi to ferment faster. It also produces a thicker consistency that works well with heavily seasoned kimchi. My personal preference is the Northern style kimchi which uses less seasoning and no rice flour because that gives the kimchi a much lighter and brighter flavor which I love. Hope this was helpful! Thanks for asking!
I study at a university in NZ and am taking a class in Korean literature at the moment. Our lecturer gave us all a link to this recipe during the lecture. Just a random story for your day from half way across the world 🙂
Oh Wow!! Thank you SO much for sharing your “random story”!! 😉 How awesome is that?!! I am honored that your lecturer chose my post…enjoy Korean literature!! Please tell your lecturer – thank you from me and if he/she needs any help with Korean culture, I’d be happy to help if I can!